
Owners manual

REV. DATE: 3/17/2016 Page 6 of 6
If installing a winch, install the roller fairlead to the bumper shell at this time. Refer to the winch manufacturer’s
instructions for installation. If installing an optional light bar, install the light bar to the bumper replacement at this
time. Refer to the light bar instructions for installation.
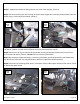
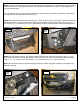
Step-9 Install the winch cover and driver and passenger side front vent covers to the bumper shell using the
supplied ¼” x ¾” button head bolts, (Photo 9 & 10). Note: Do not over tighten bolts, reference tightening torque
(71 in. lbs.).
Step-10 Install the flush mount light pods to the bumper using (4) ¼” x ¾” button head bolts and (4) ¼” nylon lock
nuts, (Photo 10).
Step-11 Trim the bottom of the driver and passenger side fender liner to match the replacement bumper.
Remember to check and retighten the factory and supplied nuts and bolts periodically.
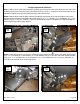
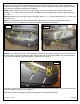
Step-12 If your state law requires a front license plate, attach the license plate bracket to the holes in the face of
the bumper shell, using the supplied 3/8” bolts, washers and nuts, and the license plate to the (2) obround holes
in the license plate bracket using the supplied ¼” bolts and nuts, (Photo 11).
If installing a winch, attach the license plate directly to the (2) obround holes in the lower face of the bumper shell
using the supplied ¼” bolts and nuts, (Photo 11).
Remember to check and retighten all factory and supplied nuts and bolts periodically.
#9
#10
#11