
Owners manual

REV. DATE: 3/17/2016 Page 5 of 6
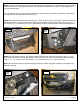
Step-4 Center the mounting plate/winch tray with the vehicle then tighten the nuts and bolts securing the auxiliary
brackets to the frame. Finger tighten all factory and supplied nuts and bolts securing the mounting plate/winch
tray and frame brackets.
If you are installing a winch, place the winch in the winch tray and refer to the winch manufacturer’s instructions
for installation. Do not install the fairlead at this time.
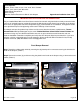
Step-5 With assistance lift the bumper shell up to the vehicle, align the holes in the bumper shell brackets with the
weld nuts on the winch tray and secure the bumper shell brackets to each side of the winch tray using (3) ½” x 1
1/2” hex bolts, (3) ½” lock washers and (3) ½” flat washers, (Photo 6). Leave the bolts loose for final adjustment.
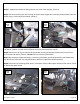
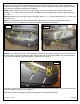
Step-6 Align the holes and attach each bumper support bracket to the vehicle frame using (2) 3/8” x 1 ¼” hex
bolts, (2) 3/8” flat washers, (2) 3/8” lock washers and (2) 3/8” hex nuts, and to the replacement bumper bracket
using (1) ½” x 1 ½” hex bolt, (2) ½” flat washers, (1) ½” lock washer and (1) ½” hex nut, (Photo 7).
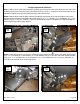
Step-7 With assistance align the replacement bumper with the vehicle and tighten all factory and supplied nuts
and bolts, (Photo 8).
#6
Driver
Side
#5
#7
Driver
Side
#8