
Owners manual
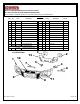

REV. DATE: 3/17/2016 Page 4 of 6
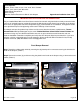
Bumper Replacement Installation
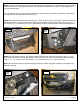
Step-1 Install the driver’s side frame bracket by positioning the bracket over the frame, align the holes and secure
the bracket to the frame using the factory paired bolts and nuts, (Photo 1). Leave the nuts and bolts loose for final
adjustment. Repeat this step to install the passenger side frame bracket.
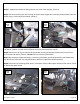
Step-2 Install the driver’s side auxiliary bracket by positioning the bracket on the side and bottom of the frame,
align the holes and secure the bracket to the frame using (2) ½” x 1 ½” hex bolts, (2) ½” flat washers, (2) ½” lock
washers and (2) ½” hex nuts, (Photo 2). Leave the nuts and bolts loose for final adjustment. Repeat this step to
install the passenger side auxiliary bracket.
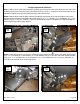
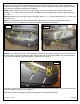
Step-3 Position the winch tray on top of the auxiliary brackets. Secure the winch tray to each frame bracket using
(4) ½” x 1 ½” hex bolts, (8) ½” flat washers, (4) ½” lock washers and (4) ½” hex nuts, and to the auxiliary bracket
using (3) ½” x 1 ½” carriage bolts, (3) ½” flat washers, (3) ½” lock washers and (3) ½” hex nuts, (Photo 3 & 4).
Leave the nuts and bolts loose for final adjustment.
#3
Driver
Side
#4
Driver
Side
#1
Driver
Side
#2
Driver
Side