
Owners manual

REV. DATE: 3/17/2016 Page 2 of 6
IMPORTANT INSTALLATION NOTES AND SUGGESTIONS
The pre-installed Mesh Winch and Vent Covers need to be removed using hand tools to slowly remove the bolts.
Using an air assisted impact or ratchet will damage the bolt threads and the internal nut assembly in the bumper
shell. Use of an appropriate anti-seize compound is highly recommended for re-installation, and tighten the bolts
to the specified torque as overtightening could result in difficulty of future removal.
To maintain and care this product keep it clean and do not use abrasive cleaners or polish waxes. Texture
Painted Finish: Mild liquid detergent may be used. Polished Stainless & Semi-Gloss Painted Finishes: We
recommend using only non-abrasive automotive wax such as pure carnauba to avoid scratches and rust.
Read the installation instructions completely and verify that all of the parts listed are accounted for. If you have
defective, missing or damaged parts or need assistance, please contact Go Rhino Products for fast, friendly
customer service at: (888) 427-4466 or email: sales@gorhino.com
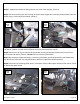
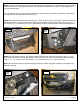
Front Bumper Removal
Step-1 Detach the rubber splash shield by removing the (6) plastic push in connectors securing the shield to the
center of the bumper, (Photo 1).
Step-2 Remove the screws (2) per side securing the plastic inner fender to the bumper using a 10mm socket and
ratchet, (Photo 2).
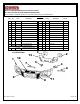
Tool Required:
10mm, 15mm, 18mm, 21mm, 7/16”, 9/16” & 3/4” Sockets
18mm, 7/16”, 9/16” & 3/4” Wrenches
Slotted Blade Screw Driver
5/32” Hex Key
Ratchet, Ratchet Extensions & Swivel Joint Adapter Approximate installation time: 2 hrs.
#1
#2
Driver
Side