
User Manual


gpelectric.com | [page 13]
4. INSTALLATION
4.1 MOUNTING FEET
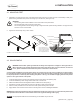
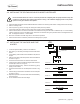
1. Assemble 4 mounting feet onto each of the solar panels frame using the 1/4” bolts and nuts. This assembly is easily com-
pleted on the ground before the panels are brought up to the RV roof. (See Figure 4-A)
WARNING:
• The mounting feet must be installed on the 4 outer holes in the panel frame.
• All 4 mounting feet must be used on a solar panel.
• The mounting surface must be strong enough to support the solar panel mounting hardware. For plywood roofs,
minumum 1/2” is recommended.
2. Tighten the nuts securely using a 7/16” wrench.
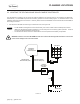
Screw
Z-Foot
Flange Nut
Flange Bolt
Solar Panel Frame
Exterior RV Roof
Use the supplied #10-16 x 1”
screws for plywood and sheet
metal roofs. For other materials,
consult your RV manufacturer
and use appropriate fasteners.
Roof must be minimum 1/2” thick plywood
or of sheet metal strong enough to support
the solar panel mounting hardware.
FIGURE 4-A: SOLAR PANEL INSTALLATION DETAILS
4.2 SOLAR PANELS
WARNING: Photovoltaic panels generate DC electricity when exposed to sunlight or other light sources.
When exposed to light, contact with the electricity active parts of the panel, such as terminals, can result in
burns, sparks and lethal shock whether the panel is connected or disconnected.
A solar system assembled from photo-voltaic panels can produce high currents which constitute an increased hazard.
Do not touch the terminals while the panel is exposed to light. Cover the panel faces completely with an opaque material
to stop the production of electricity when working with panels or wiring – the cardboard shipping boxes are the perfect
option to cover glass surface of the panels.
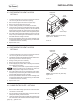
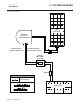
1. Locate the solar panels on the RV roof replacing each the boxes used in the planning step.
2. Locate the Cable Entry Plate / Fridge Vent Access Point on the RV roof.
3. Attached the MC4 Positive and Negative Extension Cables to the solar panel (s).
4. Test that the end solar panel cables can reach the GP-CEP / Fridge Vent Access Point.
5. Use the screws provided in the kit to secure the 4 solar panel mounting feet to the RV.
6. Apply sealant under and around each of the 4 mounting feet to ensure a watertight installation.
WARNING: All 4 mounting feet must be securely fastened to the RV roof. Failure to do so could cause the panels to lift
and separate from the RV while in transit which could cause signicant damage and/or injury.
Use appropriate sealant as recommended by your RV Dealer for your RV roof.
Note