
Weekender ISW Manual


[page 12] | gpelectric.com
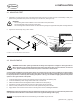
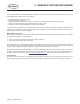
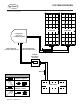
PLANNING LOCATIONS
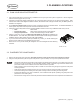
MC4 Connector
Legend
Fuse
Battery Bank
Refrigerator
Vent Cover
or Cable Entry Plate
Fuse
Inverter
Inverter
Remote
AC
Loads
AC
Panel
Transfer
Switch
Fuse
Converter /
Charger
Shore Power
/ Generator
PWM 30
Solar Charge
Controller
MC4 Red Postive
Extension Cable (25 ft)
"CLICK"
MC4 Black Negative
Extension Cable (25 ft)
Items Supplied in
Weekender Kit Only
Solar Panel
Note: Max 30A AC
service for Weekender
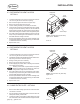
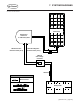
3.3 LOCATING THE GP-PWM-30 AMP SOLAR CHARGE CONTROLLER
The GP-PWM-30 is included in all Go Power! RV Solar Kits detailed in this manual except for the expansion kits (Retreat-E,
Overlander-E). The GP-PWM-30 provides the necessary protection for the RV battery system. A condensed version of the
installation instructions appear in this manual. However, please read the full installation manual included with the GP-PWM-30
Solar Charge Controller.
1. Plan where the GP-PWM-30 solar charge controller will mount, see Figure 3-B.
• The GP-PWM-30 is designed to be mounted vertically in an indoor location inside a weatherproof enclosure.
•
Ideally the GP-PWM-30 should be located so it can be easily seen for monitoring system operation. Locate at
eye level (the backlit LED affects viewing angle)
• The location will need access to the cable ends from the solar panels and the battery compartment.
Note
WARNING: Failure to secure the GP-PWM-30 could cause it to become dislodged while the RV is in transit and
cause severe damage to the unit and/or the RV.
FIGURE 3-B