
Solar Controller User Manual (GP-PWM-30-UL)
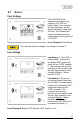


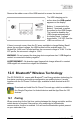


Table Of Contents
- 1.0 Installation Overview
- 2.0 IMPORTANT SAFETY INSTRUCTIONS
- 3.0 Tools and Materials Needed
- 4.0 Choosing a Location
- 5.0 Choosing a Battery
- 6.0 Installation Instructions
- 7.0 Wiring Diagram
- 8.0 Operating Instructions
- 9.0 Display Symbols
- 10.0 Inverter Control (on/off)
- 11.0 USB Charging
- 12.0 Bluetooth® Wireless Technology
- 13.0 Frequently Asked Questions (FAQs)
- 14.0 Troubleshooting Problems
- 15.0 Limited Warranty
- 16.0 Installation Template

GP-PWM-30-UL
_______________________________________________________________________
25
© 2019 Go Power!
First, connect the inverter directly
to the battery (follow the
installation instructions included
with the inverter).
Then, connect the modular cable
(found in the inverter remote box)
to the remote terminal of the
inverter and to the remote terminal
of the GP-PWM-30-UL (marked
with an AC Plug symbol).
Please change the switch of the
inverter to Position 2 (Remote
controlled).
Now you can turn the
connected inverter on or off by
holding down the AC Symbol
Button for 3 seconds.
The inverter is enabled when
the AC plug symbol appears
on the display and is off when
it disappears.
An automatic inverter low
voltage disconnect (LVD) will
be implemented in the LFP
profile when the AC icon is active and the battery falls below 11.0V. The inverter
will be reconnected once the battery has charged above 12.4V.
If the inverter is switched on by the AC button but LVD is recognized, then the
AC symbol will flash. If the inverter is switched off by the AC button and/or by
LVD, then the AC symbol will be off. If the inverter is switched on by the AC
button and not switched off by LVD, then the AC symbol will be on.
11.0 USB Charging
The GP-PWM-30-UL offers a standard USB connector for delivering 5.0 VDC to
small mobile appliances such as cell phones, tablets and small music players.
This charging port can supply up to 800 mA of current.
GP-PWM-30-UL Solar Controller
GP-PWM-30-UL Solar Controller with Bluetooth® Wireless Technology