
Solar Controller User Manual (GP-PWM-30-UL)

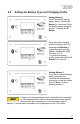
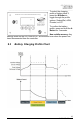
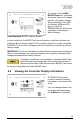
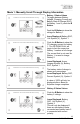
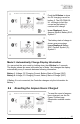
Table Of Contents
- 1.0 Installation Overview
- 2.0 IMPORTANT SAFETY INSTRUCTIONS
- 3.0 Tools and Materials Needed
- 4.0 Choosing a Location
- 5.0 Choosing a Battery
- 6.0 Installation Instructions
- 7.0 Wiring Diagram
- 8.0 Operating Instructions
- 9.0 Display Symbols
- 10.0 Inverter Control (on/off)
- 11.0 USB Charging
- 12.0 Bluetooth® Wireless Technology
- 13.0 Frequently Asked Questions (FAQs)
- 14.0 Troubleshooting Problems
- 15.0 Limited Warranty
- 16.0 Installation Template

GP-PWM-30-UL
_______________________________________________________________________
18
© 2019 Go Power!
To activate, hold the MAX
BOOST Button for 3 seconds.
As long as there is full sunlight
present, your battery voltage
will be boosted (to 14.4 VDC
for Flooded, AGM and LFP;
and 14.1 VDC for
SEALED/GEL) for 30 minutes
regardless of the battery’s
state of charge.
Icons Displayed: BOOST; Battery Symbol
In older controllers, the BOOST text icon will remain on until the controller can
maintain a Boost charge voltage for 30 cumulative minutes. In newer controllers,
the BOOST text icon will only appear while the controller is maintaining a Boost
charge voltage.
IMPORTANT: Do not use the Maximum Power Boost function more than twice a
day as it could damage your lead acid batteries due to gassing. Sustained high
voltages decrease lithium battery lifespan.
If sunlight is insufficient or not available, completing Max Power
Boost may take much longer than 30 minutes from the time of
the button press. Max Power Boost and the BOOST icon cannot
be turned off by pressing the Max BOOST button.
8.5 Viewing the Controller Display Information
GP-PWM-30-UL has two
modes to watch the display
information, manual and auto
scroll.
You can change between the
two modes by holding down
the A Button for 3 seconds.
GP-PWM-30-UL Solar Controller
GP-PWM-30-UL Solar Controller
GP-PWM-30-UL Solar Controller with Bluetooth® Wireless Technology
GP-PWM-30-UL Solar Controller with Bluetooth® Wireless Technology