
User's Manual


GO MBW Getting Started Guide
GO MBW Getting Started GuideGO MBW Getting Started Guide
GO MBW Getting Started Guide
Draft Version - Confidential - Page 22
2. Place the two brackets around the pole at the approximate height where you
wish to place the unit.
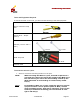
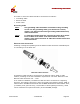
3. Insert the four screws through both
brackets and tighten them around the
pole so that the two brackets are
securely fastened.
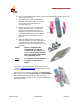
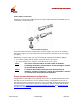
4. Attach the WLS unit to the mounting
bracket with six screws. Tighten the
screws so that the bracket and the
WLS unit are securely connected. The
connectors should be on the bottom of
the unit when it is attached to the
bracket.
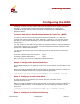
5. Slide the WLS/mounting bracket onto
the pole brackets. You can adjust the tilt
of the bracket mount to enhance the
coverage and bypass interference for the
WLS unit.
NOTE: Before completing the
installation, you should
connect the grounding and
power cables. The grounding
cable should be connected to
the grounding screw.
Noter: Le cable de la masse doit etre
connecte au visse de la
masse.
The unit is now safely mounted to the wall. See the
section on Cable Connections for information on how
to connect and start the unit.
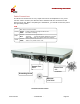
When the unit is correctly connected, the Power LED
will be green, as will the Status LED. The Activity LED
will be blinking green to indicate traffic is flowing
through the WLS. See the section on LED Indicators for
more information.