
User's Manual
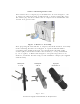
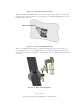
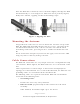
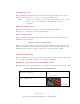
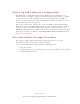
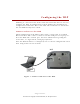
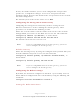
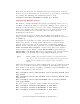
Table Of Contents
- Trademarks and Licensing Agreement
- Introduction
- GO WLAN Pico Base Station (WLP)
- Installation
- Configuring the WLP
- Connect and Access the WLP
- Upgrading the WLP Software
- Appendix A: List of Acronyms
- Appendix B: Wiring Specifications

- Page 10 of 31-
All contents are Copyright © 2006 GO Networks, Inc. All rights reserved.
Figure 2: Pole Bracket Assembly
When mounting the WLP unit to a wall, use four 5 mm bolts to secure the
bracket [A], using the holes seen in Figure 3. Wall-mounting bolts are not
supplied with the unit.
Wall mounting holes
Figure 3: Bracket Wall Mounting
After assembling the brackets, mount the WLP unit on to the bracket as
seen in Figure 45. To accomplish this, use an M8 bolt [F] inserted to the
grooved side of the ‘L’ adaptor, a flat washer [G], a spring washer [H] and
a nut [I].
Figure 4: WLP Unit Mounting