User guide Bedienungsanleitung D ES Manual del usuario F Guide d’utilisation NL Gebruikersshandleiding Guia do utilizador P I Istruzioni d’uso DK Brugsanvisning S Bruksanvisning FIN Käyttöohje 81-00057 A Rev. B GN7170_userguide.
English – GN 7170 user guide This user guide provides you with information and instructions on assembling, using and maintaining your GN 7170. This guide contains the following sections: Contents 1. Product information GN 7170 ................................ 4 1.1 Parts and signatures 2. Setting up ............................................................. 5 2.1 Telephone jack requirements 2.2 Installation prerequisites and guidelines 2.3 Connecting battery 2.4 Attaching belt clip 2.
6. Transferring CID records to memory ....................... 11 6.1 Transferring a CID record to your GN 7170´s memory 6.2 Replacing a CID record´s memory location in your GN 7170´s memory 6.3 Deleting the current CID record 6.4 Deleting all CID records 6.5 Dialing a Caller ID number 6.6 Changing the CID number format 7. Memory function ................................................... 12 7.1 Storing a name and number in memory 7.2 Changing a stored number 7.3 Storing a redial number 7.
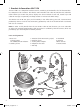
1. Product information GN 7170 The GN 7170 is as a telephone-headset solution, combining all the benefits of a full-featured wireless telephone and a headset. The wireless GN 7170 offers full Caller ID (CID) features (identifies callers before you answer the phone, displays the time and date of each call, records up to 40 Caller ID messages sequentially and keeps records of missed calls while away).
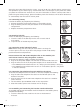
2 Cordless phone 2a Display 2b Volume controls or 2c Redial button 2d Headset cord receptor 2e Memory (MEM) button 2f Tone button 2g Delete/Channel button 2h Call back/Talk button 2i Format button 2j Ringer Off/ON button 2k Program/Flash button *Battery *The battery is located inside the GN 7170 cordless phone battery compartment and must be connected correctly prior to charging. 2 2a 2b 2c 2h 2d 2i 2e 2j 2f 2k 2g 2.
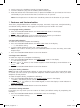
About the GN 7170’s digital security system. Your GN 7170 uses a digital security system to provide protection against false ringing, unauthorized access and charges to your phone line. When you place the handset into the base unit, the GN 7170 verifies its built-in security code. After a power outage or battery change, place the cordless phone into the base unit for about 20 seconds to automatically reset the built-in security code. 2.3 Connecting battery Connect the battery by completing the following: 1.
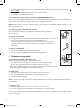
2. Gently snap on the headband around the headset receiver. 3. Insert the headset’s plug into the cordless phone headset jack. 4. Place the headset into the headset stand, or place the headband on your head so that it rests comfortably on your head and that the ear cushion rests on your ear. Note: The microphone on the boom arm should be pointed in the direction of your mouth. 3.
2. Use the or button (or the number keypad) to move the display’s arrow indicator to 1 NO or 2 YES. 3. Press the FLASH/PROGRAM button to store the selection. • You will hear a confirmation tone. 3.5 Activating custom calling features: FLASH/PROGRAM button Pressing the FLASH/PROGRAM button will activate custom calling features such as call waiting or call transfer. Such features are provided by your telephone operator.
4.2 Redial You may redial the previously-dialed number (maximum of 32 digits) by pressing the REDIAL button. 4. 3 CHARGE/IN USE indicator The base unit’s CHARGE/IN USE indicator is lit when the handset is charging in the base unit, or when the handset’s RINGER switch is set to the ON position. The base unit’s CHARGE/IN USE indicator flashes during a phone call, or when the PAGE/FIND button is pressed. 4.
4.10 Volume To adjust the volume, ensure the RINGER switch is ON, and press the four volume levels. increases volume, decreases volume. buttons. There are The volume LED is in the handset’s display, and the volume level is shown in the display. • VOL 1 is the lowest volume level • VOL 4 is the highest volume level. 4.11 Call Timer The total talk time of a call is displayed on the bottom line of the handset display. 5.
5.3 Reviewing CID Records As calls are received and stored, the display is updated to let you know how many calls have been received. Note the following functionality: • Press the button to scroll through the call records from the most recent to the oldest. • Press the button to scroll through the call records from the oldest to the newest. 6. Transferring CID records to memory It is also possible to store received or reviewed CID information to your GN 7170’s own memory.
6.5 Dialing a Caller ID number To dial a number from your Caller ID records, complete the following: 1. Make sure the GN 7170 is OFF (not in talk mode) 2. Use the or button to display the desired CID record. 3. Press the TALK/CALL BACK button. The number dials automatically. 6.6 Changing the CID number format The format button lets you change the format of the displayed CID number if, for example, the number is not dialing correctly.
7.3 Storing a redial number To store a redial number, complete the following: 1. Repeat steps 1-6 in the Storing a name and number in memory section. 2. Press the REDIAL button. 3. Press the MEM button again to store the number. • You will hear a confirmation tone. To replace an old redial number, complete the following: 1. Repeat steps 1-6 in the Storing a name and number in memory section. 2. Press the MEM button. • REPLACE MEMO shows in the display. 3.
7.7 Chain dialing from the memory Chain dialing from the memory is ideal for making calls that require a sequence of numbers to be dialed, such as using a calling card to call a frequently-dialed long distance number. Chain dialing from the memory works by storing the sequences of numbers in the GN 7170’s memory locations (0 through 9). See the Storing a name and number in memory section for relevant instructions, and specifically step 3 (choosing the memory location).
8. Display messages and sound signals 8.1 Display messages table Display message Meaning INCOMPLETE DATA Caller information has been interrupted during transmission or the phone line is excessively noisy. ENTER NAME Prompt telling you to enter the name for one of the 10 memory locations. ENTER TEL NUMBR Prompt telling you to enter the telephone number for one of the 10 memory locations.
9. Frequently asked questions Q. I’ve installed my GN 7170 and connected the power source, but the cordless phone’s display is not working. • Verify that you have connected the battery (inside the battery compartment) correctly. Connect the battery cord into the receptor located inside the battery compartment. • Ensure that the battery is fully charged. Q. My Caller ID features don’t seem to work/the display is not working.
Q. What is the range of my GN 7170? The GN 7170 has a range of up to 150 feet/45 meters in standard office environments. Factors such as other electrical devices or office walls may compromise the GN 7170’s range. Q. The CHARGE/IN USE indicator on the base unit is flashing. Provided your local telephone operator offers voice messaging services and that you subscribe to these, the CHARGER/IN USE indicator flashes (when not in use) to indicate that you have a message waiting.
• • • • Do NOT expose the base unit or cordless phone to direct sunlight or moisture. Avoid dropping any parts and avoid other rough treatment of the GN 7170. Clean with a soft cloth. Never use a strong cleaning agent or abrasive powder because this will damage the finish of the GN 7170’s parts. • Retain the original packaging in case you need to ship the phone at a later date. This telephone system meets FCC standards for hearing Aid Compatibility. 18 GN7170_userguide.