User Manual (Part 2) 2.
You must install and charge the battery before using the telephone STOP! See page 7 for easy instructions For customer service or product information, visit our web site at Please also read www.telephones.att.com Enclosed in product package User Manual (Part 2) 2.
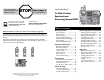
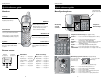
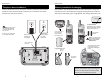
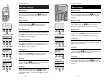
Getting Started Getting Started Quick reference guide Quick reference guide Handset Base/Speakerphone Swivel antenna fully upright for best results Softkeys Press a softkey to select a menu item displayed just above the key. Off/Clear During a call, press to hang up. Item 1 Item 2 Item 3 While using menus, press to cancel an operation, back up to the previous menu, or exit the menu display. Phone/Flash Press to begin a call, then dial a number.
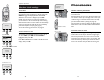
Getting Started Getting Started Parts checklist Before you begin Remember to save your sales receipt and original packaging in case you ever need to ship your telephone for warranty service. Check to make sure the telephone package includes the following: About Caller Identification Telephone operating range Caller ID with Call Waiting features in this telephone let you see who’s calling before you answer the phone, even when you’re on another call.
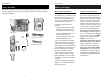
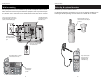
Getting Started Getting Started Telephone base installation Battery installation & charging Install the speakerphone base as shown below. Choose a location away from electronic equipment, such as personal computers, television sets or microwave ovens. Avoid excessive heat, cold, dust or moisture. After installation, place the handset in the base and allow the batteries to charge for 8 hours before use. You can keep batteries charged by returning the handset to the base after each use.
Getting Started Getting Started Wall mounting Belt clip & optional headset The speakerphone base can be installed on any standard wall-phone outlet as shown below. Choose a location away from electronic equipment, such as personal computers, television sets or microwave ovens. Avoid excessive heat, cold, dust or moisture. Install belt clip as shown below if desired.
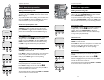
Telephone Operation Telephone Operation Basic handset operation Basic base operation Making and answering calls Making and answering calls To answer a call, press PHONE or any dial pad button. To make a call, press PHONE, then dial a number. Press OFF to hang up. Volume To preview numbers before dialing, enter numbers first, then press PHONE to dial. Press CLEAR at any time to make corrections as you are entering numbers. Speakerphone MENU MEM Last number redial To answer a call, press SPEAKER.
Telephone Operation Volume Flash Silence ringer Tone Telephone Operation Options while on calls Intercom calls To adjust volume or sound quality Intercom calls Press VOLUME buttons on the handset or the base to adjust listening volume. Each button press raises or lowers volume by one level. The intercom allows conversation between the handset and base, or between handsets if you have registered additional handsets for use with your system.
Telephone Operation Telephone Operation Handset settings Base settings Ringer volume Ringer volume At this menu you can set a default ring volume level (14), or turn the ringer off. Press the <> buttons to hear an example of each level. Press OK to save your selection. At this menu you can set a default ring volume level (16), or turn the ringer off. Press the <> buttons to hear an example of each level. Press OK to save your selection.
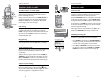
Telephone Operation Handset clock settings To set time Phonebooks PAT JOHNSON 123-456-7890 ^ EDIT ^ Follow steps at left to set the handset clock time. Use the keypad to enter four digits (i.e., 09:15), then press AM/PM to toggle the display between AM and PM. When the correct time is displayed, press SAVE. NOTE: You can choose to set the time manually, or you can allow it to be set automatically with incoming Caller ID information.
Phonebooks Phonebooks Enter number, then press MEM Press MEM to select phonebook New phonebook entries 555-1234 PAUSE MENU MEM To enter a number Phonebook search REDIAL MENU MEM Use the dial pad to enter up to 32 digits. When the number is complete, press MEM. Enter name, then press SAVE • Press CLEAR to erase numbers if you make a mistake. To browse through the directory • Press PAUSE to enter a 3-second dialing pause.
Phonebooks PAT WILLIAMS 555-1234 ^ OK Caller ID Logs To dial, edit or delete entries ^ To dial a number CHRIS THOMPSON 123-555-6789 11:29 A OCT4 When any phonebook entry is displayed, press PHONE (or SPEAKER) to dial the displayed number. Press DEL to delete entry DEL CHRIS THOMPSON 123-555-6789 11:29 A OCT4 N01 • To delete only the displayed entry, press THIS. • To delete all entries in the phonebook, press ALL .
Caller ID Logs To review your call log HANDSET 1 REDIAL MENU MEM To review your call log Caller ID Logs CHRIS THOMPSON 123-555-6789 11:29 A OCT4 N01 ^ CID V The most recent call is displayed first. Use the arrow buttons to scroll through the list as shown at left. CALLS LOG To return a call ^ OK V Press PHONE (or SPEAKER) to call the person currently displayed (see next page for important dialing options).
Answering System Operation 14 Answering System Operation Day and time announcements To set day and time Before playing each message, the answering system announces the day and time the message was received. Message capacity Message counter Number of messages waiting (or, during playback, message number currently playing) The answering system can record up to 99 messages, depending on how long each message is.
Answering System Operation 12 Answering System Operation A Outgoing announcements Outgoing announcements are the messages callers hear when calls are answered by the answering system. Elapsed recording time (seconds) 1 Press to stop recording MENU To record your outgoing announcement “Change announcement” Press MENU until you hear “Change announcement.” Then press RECORD and begin speaking after you hear “Now recording.” Speak facing the telephone base from about 9 inches away.
Answering System Operation Answering System Operation Changing feature options Number of messages waiting (or, during playback, message number currently playing) Menu features can be changed to customize how the answering system operates. Press MENU repeatedly to hear each feature. Press CHANGE when you hear the feature you want to modify. 1 CHANGE Press until desired selection is heard 3 MENU Press to set selection and move to next menu option Or Feature options Press PLAY/STOP to hear messages.
Answering System Operation Answering System Operation 12 Message playback (at handset) Follow the steps at left to use your handset to review or delete voice messages. Listening options HANDSET 1 REDIAL MENU MEM When you select PLAY MESSAGES you will hear messages through the handset speakerphone. Press SPEAKER to transfer playback to the handset earpiece for private review of messages.
Answering System Operation Answering System Operation 1 Message window displays 12 Message window (Flashes when new messages are waiting) The message window usually displays the total number of memos and incoming messages. See list below for explanation of other displays in this window. Message window displays 0 No messages waiting. 1-8 Current volume level while adusting volume 1-98 Number of messages/memos, or message currently playing (see page 29).
Appendix Appendix Display screen status icons Alert tones and indicator lights Handset status icons HANDSET 1 REDIAL MENU MEM T Alert tones Phone in use (external call) “Beep-Beep-Beep-Beep-Beep” (5 quick beeps) Handset battery is low. Place handset in base to charge the battery. Phone in use (intercom call); flashes when handset is being paged “Beep” (Single beep) Handset registration or programming command successfully completed.
Appendix Appendix Adding new handsets Charging spare batteries Your telephone can accommodate up to eight cordless handsets . You can add new handsets (Model E250, sold separately) at any time, but each must be registered with the base before use. Optional spare batteries (sold separately) can be kept charged in the base, for quick replacement when handset batteries become depleted. For best results, use AT&T 2AA rechargeable batteries (sku 26820).
Appendix Appendix In case of difficulty In case of difficulty If you have difficulty with your phone, please try the suggestions below. For Customer Service, visit our web site at www.telephones.att.com, or call 1 800 222–3111. Telephone does not work at all Phone does not ring If you hear noise or interference during a call If you lose a call while using the handset • You were probably out of range. Move closer to the base.
Appendix Appendix Index Index A AC adapter, 6 Access code, 28, 33 Alert tones, 35 Answering calls, 10, 11 Answering system, 24 announce only, 27 delete messages, 29, 30 feature options, 28 handset access, 30 outgoing announcement, 26 memos, 31 message window, 32 play messages, 29, 30 remote access, 33 remote access code, 28, 33 Antenna, 7 E Elapsed time, 26, 31 Ending calls, 10, 11 Error tones, 35 F Flash (switchhook flash), 12 H Hands-free use, 10, 11 Headphone, 9 Hold, 10, 11 I Incoming call log, 21
Appendix Appendix Technical specifications Remote access wallet card RF Frequency Band (Handset to Base) 2400 MHz — 2483.5 MHz Your package includes a handy wallet card to help you remember access commands you can use to control your answering system from any touch-tone telephone. RF Frequency Band (Base to Handset) 2400 MHz — 2483.5 MHz If you misplace this card, just clip and save the card below.
www.telephones.att.com Copyright © 2003 Advanced American Telephones. All Rights Reserved. AT&T and the Globe Design are trademarks of AT&T Corporation, licensed to Advanced American Telephones. Printed in China. Issue 1.2 AT&T 12/12/03.