
Instruction Manual


www.glp.de
14 impression
FR10 Bar Quick Start and Safety Manual Rev. A
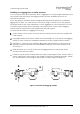
Loop the cable around a secure anchoring point such as a truss chord or fixed
structure so that it will catch the fixture if a rigging clamp fails. Take up as much
slack as possible in the safety cable (by looping it more than once around the truss
chord, for example).
See Figure 4. Open one of the retractable safety cable attachment eyelets
(arrowed) in the sides of the fixture and fasten the safety cable to it.
If there is any danger that the fixture may swing dangerously from the safety cable
if a primary attachment fails, open the second retractable safety cable eyelet at
the other end of the fixture and add a second safety cable as described above,
fastening it to this second eyelet.
Check that the fixture is now secured.
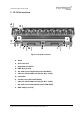
End-to-end alignment
The FR10 features alignment pins that let you line up
fixtures perfectly end-to-end to create an unbroken
line of pixels. To use the alignment pins:
See Figure 5. The alignment pin release button is
located on the base of the fixture at the left-
hand end when viewing the fixture from the
control panel side.
Slide the release button to the left to move the
alignment pins out of the fixture.
Engage the pins in the corresponding holes in
the right-hand end of the next fixture to line the
two fixtures. The pins are for alignment purposes
only, do not apply a load to them.
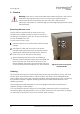
Standing an FR 10 Bar on a horizontal surface
To place an FR 10 Bar fixture standing
horizontally on a stable horizontal surface:
Stand the fixture on its feet as shown in
Figure 6. Make sure that it is safe and
secure, and that it will not present a
danger of tripping or falling.
If there is any danger of injury or
damage if the fixture falls from the
surface, secure it with a safety cable as
described in ‘Securing the fixture with a
safety cable’ on page 13.
Figure 6. FR 10 Bar placed on a
horizontal surface
Figure 5. Alignment pin
release button