URBAN GARDEN INSTRUCTIONS INSTRUCCIONES www.glowpear.com.
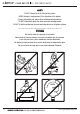
SAFETY DO NOT attempt to sit or stand on the planter. NEVER attempt a single person lift or relocation of the planter. Fill only with potting soil and/or other suitable planting mediums. DO NOT intentionally block the water reservoir drainage points. DO NOT fit with unauthorised pressure watering devices or irrigation systems. SEGURIDAD No intente sentarse o pararse en la maceta. Nunca trate de elevar o reubicar la maceta a mano de una sola persona. Llene sólo con tierra y otros medios de siembra adecuadas.
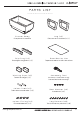
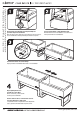
PA R T S L I S T Planter Body Cuerpo de la maceta Leg (x2) Piernas de la maceta ( x 2 ) D r i p Tr a y ( x 2 ) Bandejas de goteo ( x 2 ) Root Barrier Mat Tapete de obstrucción de raíces Wicking Cups (x2) Tazas de riego ( x 2 ) (located in underside of leg) A s s e m b l y To o l Herramienta de montaje J o i n e r Tu b e ( x 2 ) Tubo de ensamblador ( x 2 ) Seal Washer (x4) Arandelas ( x 4 ) Joiner Fitting (x4) Ensambladores ( x 4 ) Leg Screws (x8) Tornillos de las piernas ( x 8 ) www.glowpear.
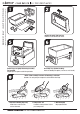
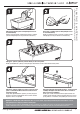
A S S E M B LY I N S T R U C T I O N S 1 2 Remove Assembly Tool from Leg. Remueva la herramienta del marco. 5 6 Ensure Plugs are tightly fitted using Assembly Tool provided. Asegure que los tapones estén bien apretados. 8 NOTE: Follow carefully to ensure self-watering is activated. Cuidado: Use esta guía para asegurar la activación del auto-riego. 1. Add soil to Wicking Cups only. Añade tierra en las tazas de mecha solamente. 4 Insert Drip Trays (Indoor Use Only).
3 Slide Legs into place. Ponga los marcos en lugar para erigir la plataforma. 4 Tighten firmly with Assembly Tool provided. Apriete firmemente con la herramienta facilitada. 7 Drop in Wicking Cups. Ponga las tazas de mecha en su lugar. 9 10 Ready to add soil and plants. Listo para Añadir suelo de tierra y las plantas. Place Root Barrier Mat down in base. Coloca la estera en la plataforma interior, abajo en la base. www.glowpear.com.au Refer to www.glowpear.com.au for planting guide.
M U LT I P L E P L A N T E R A S S E M B LY 1 Remove plugs from adjoining side using Assembly Tool provided - Repeat for each Planter. Quite los tapones de los lados que serán usados para unir las macetas. Use la herramienta de montaje incluida para remover los tapones. 2 Screw in Joiner Fittings - Firmly tighten by hand. Atornille firmemente los ensambladores. Use solamente su mano para atornillar los ensambladores. 3 Push-fit Joiner Tubes onto Joiner Fittings.
Add soil mix to Planter (refer to www.glowpear.com.au for recommendations). Mezcla el suelo de mantillo, preferiblemente orgánico, y añádelo (consulte www.glowpear.com.au para obtener instrucciones). 2 Plant seeds or seedlings (refer to www.glowpear.com.au for recommendations). Añade las semillas de plantas o las plantas crecidas (consulte www.glowpear.com.au para obtener recomendaciones). 3 P L A N T I N G & WAT E R I N G 1 Add approx. 1 gallons (3.
CARE INSTRUCTIONS Periodic maintenance and cleaning will allow the product to keep its original look and lengthen the duration of its performance. The Glowpear™ Urban Garden planter is made of HDPE plastic resin that has been UV protected so that it survives outdoor environments. You can clean the plastic surfaces of the planter by hand with soap and warm water. For certain hard to lift stains additional cleaning power in the form of a 1/3 bleach and 2/3 water solution may be required.