INFOTAINMENT CENTER Owner’s Manual Before using this product, please read this manual fully to ensure correct operation. Keep the manual at hand for future reference.
THIS IS A DISCLAIMER OF LIABILITY AND DAMAGE RESPONSIBILITY AS REGARDS TO THE INFOTAINMENT CENTER MANUFACTURER AND YOUR USE OF THE PRODUCT. YOU ASSUME TOTAL RESPONSIBILITY AND RISK FOR USING THIS SYSTEM. Failure to properly focus on the operation of your motor vehicle can result in death, serious injury and property damage. The Infotainment Center should never be used at a time or in a manner that distracts you from properly focusing on operation of the motor vehicle in which it is installed.
IMPORTANT SAFETY INFORMATION Safety Information Read the operating instructions for the Infotainment Center and all other components of the system carefully before using the system. FAILURE TO OBSERVE THE INSTRUCTIONS GIVEN IN THIS MANUAL MAY CAUSE INJURY OR DAMAGE AND VOID THE WARRANTY. Warnings Observe the following warnings when using this unit: • • • • • • The driver should neither watch the display nor operate the system while driving.
CAUTION: TO REDUCE THE RISK OF ELECTRIC SHOCK, DO NOT REMOVE COVER (OR BACK). NO USER SERVICEABLE PARTS INSIDE. REFER SERVICING TO QUALIFIED SERVICE PERSONNEL. CAUTION: THIS DVD VIDEO RECORDER IS A CLASS 1 LASER PRODUCT. USE OF CONTROLS, ADJUSTMENTS OR PERFORMANCE OF PROCEDURES OTHER THAN THOSE SPECIFIED HEREIN MAY RESULT IN HAZARDOUS RADIATION EXPOSURE. DO NOT OPEN COVERS AND DO NOT REPAIR THE PLAYER YOURSELF. REFER SERVICING TO QUALIFIED PERSONNEL.
Customer Feedback Your Infotainment Center has been designed specifically for use in Recreational Vehicles. This system has been designed to offer a rich and intuitive feature set that is simple to use and even easier to enjoy. We have engineered this system based off input from real RV’ers like you! We want your feedback.
Contents 1 2 3 Features .............................................................................................................. 7 Main Unit Display ................................................................................................ 8 Setup................................................................................................................. 10 3.1 General Settings ........................................................................................... 10 3.2 Video Setup ...
1 Features Motorized 6.
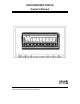
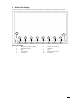
2 Main Unit Display The buttons located on the Infotainment Center front display are assigned the same reference here below.
POWER 1. 2. 3. 4. Turn on the ignition to power up the Infotainment Center. The buttons on the front of the unit light up. When the Infotainment Center is started up, it will immediately go to the last mode (memory on playback) before it was turned off. In order to put the unit in standby mode, please press the Power button (PWR) for more than 2 seconds. During standby, the display will show your vehicle graphic or be off. Your preference can be set in the Settings menu (See page 10).
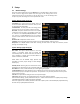
3 Setup 3.1 General Settings Access the System Settings by using the Settings icon in the Main Menu. The first screen shown is the first page of the system setup. The pages of the Settings menu can be changed by using the on-screen button in the top right corner. To exit the Settings menu at any time, press the Settings icon in the top left of the screen. System Settings page one (1/2): Tilt Position: This option allows the manual control of the tilt mechanism behind the LCD screen.
3.2 Video Setup By touching the VIDEO button, the settings for the video part of the Infotainment Center can be changed. Video Settings page one (1/1): Brightness: Sets the brightness level (-10 – +10). Contrast: Sets the contrast level (-10 – +10). Tint: Sets the tint level (-10 – +10). Color: Sets the color level (-10 – +10). Sharpness: Sets the sharpness level (-10 – +10) PIP: This option lets you choose your video display when in PIP (Picture in Picture) mode.
4 Radio Operation Radio mode can be selected from the Main Menu by pressing the Radio icon on the LCD display. The Radio mode can be left at any time by pressing the Radio icon at the top left of the Radio screen. The radio interface contains several buttons that all have their specific purpose. Below is an explanation of each button and its functionality. This button allows the selection between the FM and AM bands. There are 3 FM and 2 AM ranges available, all with 6 available presets.
5 CD Player Operation CD/DVD mode can be selected from the Main Menu by pressing the DVD icon on the LCD display. The CD/DVD mode can be left at any time by pressing the Disc icon at the top left of the CD/DVD screen. Disc Insert/Eject 1. 2. 3. Press the EJECT button below the LCD display to get access to the CD/DVD player behind the LCD display. Place the CD (label side up) into the CD/DVD slot. Push the disc in gently until the loader inserts the disc itself.
6 USB - MP3/WMA/MP4 Player Operation USB mode can be selected from the Main Menu by pressing the USB icon on the LCD display. The USB mode can be left at any time by pressing the USB icon at the top left of the USB screen. To access and use the USB feature please connect your USB compatible device (USB stick, HD, etc.) first to the USB cable provided. The MP3/WMA/MP4 files can be accessed from USB memory or from a CD/DVD disc.
7 DVD/VCD Player Operation (Please refer to the safety instructions in regard to video playback on page 3) CD/DVD mode can be selected from the Main Menu by pressing the DVD icon on the LCD display. The CD/DVD mode can be left at any time by pressing the Disc icon at the top left of the CD/DVD screen. Disc Insert/Eject 1. 2. 3. Press the EJECT button below the LCD Display to get access to the CD/DVD player behind the LCD Display. Place the DVD (label side up) into the CD/DVD slot.
DVD Settings page two (2/2): Sound Mode: Here a selection can be made to set up the speaker system connected. When a full 5.1 system is connected, the sound mode can be set to 6CH. When a normal audio system is connected, 2CH has to be selected.
8 Bluetooth Operation Bluetooth mode can be selected from the Main Menu by pressing the Bluetooth icon on the LCD display. The Bluetooth mode can be left at any time by pressing the Bluetooth icon at the top left of the Bluetooth screen. The Infotainment Center supports Bluetooth wireless connections. It can set up a wireless link with a Bluetooth mobile phone. The unit supports a hands-free profile and A2DP (Audio Advanced Distribution Profile).
Notes on Pairing: 1. If PAIR START appears temporarily, the pairing cannot start due to an active connection. Please disconnect any active mobile phones. 2. Only when PAIRING is displayed, the Infotainment Center becomes visible for mobile phones. Use your mobile phone to search for the Infotainment Center to connect to your mobile phone. 3. When connecting, the Infotainment Center will identify itself to your phone as “XSG2”. The mobile phone will ask for a PIN code.
8.3 Incoming Calls While the mobile phone is connected, incoming calls will be handled by the Infotainment Center. When an incoming call is present, the LCD display will switch to Bluetooth mode and show the phone number (when available) from the person calling. Under the phone number, the buttons Accept and Reject are present. Press to accept the call. The Infotainment Center will accept the call and give the call audio over the normal car speakers. Press to reject the call.
8.5 AV (A2DP Audio Playback over Bluetooth) Some mobile phones also support the functionality of A2DP (Audio transfer protocol). The Infotainment Center uses this protocol to find audio files on the mobile phone and play the audio over the normal speakers. Press AV in the standard Bluetooth screen.
9 SIRIUS Satellite Radio The Infotainment Center is compatible with an optional SIRIUS Satellite Radio Direct Connect device (please see your dealer for compatible devices). When a SIRIUS receiver is connected, press the SIRIUS icon in the main menu. The SIRIUS mode can be left any time by pressing the SIRIUS icon at the top left of the screen. This section describes the features and functions of the SIRIUS Satellite Radio system.
Channels can be locked to restrict access to certain channels. To lock a channel: 1. Tune to the channel you wish to lock. 2. Press Lock to bring up keypad. 3. Enter a lock code. The first time you use the lock feature you can enter any 4 digits you choose to have as your lock code. You will need to remember this code every time you use the lock feature. 4. Press 5. Tune to another channel. 6. Channel is now locked and removed from all channel lists. To tune to a locked channel: 1.
10 iPod and iPhone AV Interface The Infotainment Center can also be connected to your Apple iPod or iPhone. When the iPod is connected, press the iPod icon in the Main Menu. The iPod mode can be left any time by pressing the iPod icon at the top left of the screen. To access and use the iPod feature please connect your iPod/iPhone device first to the iPod cable provided. FUNCTIONS Play or pause current playback. Change the track list to find tracks based on categories.
11 Camera (Optional) The Infotainment Center can be connected to an optional rearview camera or camera control box (for multiple cameras) to enhance viewing around your vehicle while performing maneuvers. When connected, the camera AV source can be displayed in two ways: Manual Viewing: By selecting the Camera icon from the Main Menu you can have full screen display of your rear camera. You can also manually view your rear camera and navigation simultaneously using the Picture in Picture (PIP) feature.
12 Navigation (Optional) The Infotainment Center is capable of providing navigation. If you have purchased this option please see your Navigation Program User Manual for instructions on using the navigation software. Your optional Navigation Program is stored on an SD card. This card is entered into the SD card slot found on the bottom of the LCD display housing. Press the Eject button to lower the screen. Here you will see the SD card slot.
13 Premium Remote Control Accessory (Optional) The Infotainment Center is compatible with the Premium Remote Control accessory. No. 1 2 3 4 5 6 7 8 9 10 11 12 13 14 15 16 17 18 19 20 21 22 23 24 25 26 27 28 29 30 31 32 33 34 Main Activity LED Power Mode Mute Setup V.
SIRIUS Key 9 10 11 14 21 22 23 24 25 26 31 32 Function Joystick control Next Previous Band Numeric 1 (Preset 1) Numeric 2 (Preset 2) Numeric 3 (Preset 3) Numeric 4 (Preset 4) Numeric 5 (Preset 5) Numeric 6 (Preset 6) MENU GO TO Description UP/DOWN Search Channel Up/Down. LEFT/RIGHT Search Categories. Depress to select.
Radio Key 10 11 14 21-26 27 28 29 Function Next Previous Band Numeric (Preset *) Numeric 7 (Radio AF) Numeric 8 (Radio PTY) Numeric 9 (Radio REG) Description Tune/ Hold for Seek Go to next set of Preset Channels (3X6) Tune to saved Channel Preset 1-6 Alternative Frequency ON/OFF Activate Program Type Tuning Activate Regional Programming USB/DVD/CD Key 7 8 9 10 11 12 16 21-30 31 32 33 34 Function Subtitle (DVD) Audio (DVD) Joystick control Next (hold for fast forward) Previous (hold for rewind) Play/P
2010 All rights reserved. No part of this manual may be reproduced, copied, transmitted, disseminated, transcribed, downloaded or stored in any storage medium, in any form or for any purpose without the express prior written consent of River Park Inc. Furthermore, any unauthorized commercial distribution of this manual or any revision hereto is strictly prohibited. Information in this document is subject to change without notice.