
C10, C12 NEW C Series Slicer Sanitizing and Cleaning Wall Chart (NSF 2010 Cert)

Reinstall the knife cover. Place the
knife cover over the knife, centering it
on the knife hub. Then, while holding
the knife cover in place with one
hand, begin turning the knife cover
release knob clockwise with your other
hand until the knife cover is securely
in place.
Globe Food Equipment Company • 1-800-347-5423 • www.globeslicers.com
Carefully wash the top and bottom
of the knife by wiping from the
center of the knife outward. A
nylon brush can also be used.
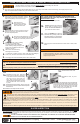
HOW TO CLEAN, SANITIZE & INSPECT YOUR GLOBE SLICER
• The slicer knife is very sharp. Exercise extreme caution when working near the knife.
• DO NOT hose down or pressure wash any part of the slicer.
11.
10.
Turn slicer off, turn slice thickness dial clockwise past zero “0” until it stops so the table covers the knife edge, and unplug the power cord.
Wipe off all visible food/food debris and juices from the entire slicer.
16.
5.
4.
Remove the knife sharpener. Loosen the screw
on the neck of sharpener then lift the knife
sharpener off and away from the slicer.
Carefully reinstall the slice defl ector.
Slicer UnitRemovable Slicer Parts
In a sink with a solution of warm, clean water and mild detergent,
soak, scrub, and clean all surfaces of the removable parts.
Thoroughly rinse off all surfaces with a clean cloth in warm, fresh
water.
To prevent illness or death caused by the spread of food-borne pathogens, it is important to properly clean and sanitize the entire slicer as any surface of the slicer
can become contaminated. It is the responsibility of the slicer owner/operator to follow all guidelines, instructions and laws as established by your local and state
health departments and the manufacturers of chemical sanitizers.
Once your slicer makes contact with food product, the entire slicer, including removable parts, must be thoroughly cleaned and sanitized. This process is to be
repeated at least every 4 hours using these procedures and information; and must comply with additional laws from your state and local health departments.
As with all food contact surfaces, it is extremely important to properly sanitize the entire slicer and to closely follow the instructions on your quaternary sanitizer container
to ensure proper sanitation is achieved to kill potentially harmful bacteria.
IMPORTANT: If a chemical sanitizer other than chlorine, iodine or quaternary ammonium is used, it shall be applied in accordance with the EPA-
registered label use instructions. Excessive amounts of sanitizer and/or use of products not formulated for stainless steel or aluminum may VOID your warranty.
Sanitizer concentration shall comply with section 4-501.114, Manual and Mechanical Warewashing Equipment, Chemical Sanitization - Temperature, pH, Concentration, and Hardness of
the FDA Food Code.
Maintain the Owner’s Manual supplied with this machine and refer to it often for complete information on cleaning, sanitizing and maintaining the slicer.
Use a clean cloth in a solution of warm water and
mild detergent for each step below. Ring out excess
water from the cloth.
1.
INSPECTING THE SLICER FOR DAMAGED OR BROKEN PARTS INCLUDING GASKETS & SEALS. A thorough visual inspection should be made of the entire
slicer and its parts. Globe urges the owner/operator to inspect all components often, including ones that are detachable for cleaning and sanitizing. This inspection
should include: looking for damaged parts, broken seals or gaskets, and areas that may be more diffi cult to clean and sanitize. Please refer to your Owner’s Manual
for seal and gasket locations.
IF A SEAL OR GASKET IS FOUND TO NOT PROPERLY SEAL, IS DAMAGED, OR IS MISSING, THE SLICER MUST BE REMOVED FROM
SERVICE UNTIL IT IS REPAIRED BY AN AUTHORIZED SERVICER.
SLICER INSPECTION
Clean the ENTIRE slicer. Wipe the
slicer table off by starting at the knife
and pulling towards you. NOTE: Never
wipe the slicer table towards the knife.
12.
2.
Remove the food
chute from the slicer by
loosening the food chute
knob on the chute arm.
Reinstall the knife sharpener. Attach it to the top
of the slicer and secure it with the knife sharpener
release knob.
Note: DO NOT use the sharpener with wet stones.
Reinstall the clean, dry food
chute.
17.
Remove the food chute’s end weight. Hold the
end weight and unscrew the slide rod. Pull the
slide rod completely out of the end weight.
3.
7.
8.
6.
Thoroughly rinse off all removable parts in warm, fresh water.
In a clean sink with a solution of warm, clean water and properly diluted sanitizer*, soak the removable parts. Remove the parts and allow them
to air dry without removing the sanitizer from the surface.
Spray or wipe down the slicer with properly diluted sanitizer* and allow the it to air dry before using the slicer without removing the sanitizer.
*NOTE: To properly sanitize your slicer & its removable parts, it is important to strictly follow the instructions on your sanitizer container.
13.
14.
15.
18.
19.
Reinstall the end weight. Align the end weight with
the chute and insert the slide rod through the chute
and end weight’s pivot point. Allow the end weight
to rest on the food chute and secure it by hand
tightening the screw of the slide rod to the slicer
chute. Finally, plug in the power cord.
Printed 10.8.2012 GFE-C100512 Rev. 1.
Disassemble the food chute. Using the knob on
the back of the chute, unscrew the food chute
into three separate pieces.
Remove the knife cover by rotating
the knife cover release knob
counterclockwise until it releases,
while carefully holding the edge of the
knife cover, and lifting the knife cover
upward to remove.
Remove the slice defl ector by
loosening the screw knobs.
9.
Reassemble the food chute.
20.
With the slicer table completely closed...
REASSEMBLE THE SLICER
SANITIZE ALL REMOVABLE PARTS AND THE ENTIRE SLICER
CLEAN AND SANITIZE THE KNIFE SHARPENER AFTER SHARPENING
Following sharpening, the slicer, sharpener, and all its parts
must be cleaned and sanitized. Clean and sanitize the slicer
using these procedures.