
C9, C10, C12 NEW C Series Chefmate Slicer Manual (NSF 2010 Cert)


Page 12
Cleaning & Sanitizing
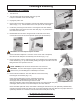
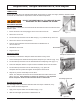
BE ALERT. The slicer knife is fully exposed. Always be aware of the placement of
your hands/ngers in relationship to the knife.
10. The knife must also be cleaned and sanitized. Carefully wash and rinse the
top and bottom of the knife by wiping from the center of the knife outward
(Fig. 12-1). Spray both sides of the knife, slicer table and the entire slicer base
with a non-bleach, non-chlorine sanitizer following the instructions on your
quaternary sanitizer container to ensure proper sanitation is achieved. Allow
the slicer parts to air dry.
An important step to kill bacteria is to allow the parts to air dry before reassembly!
DO NOT allow moisture to get into knife hub.
After cleaning and sanitizing the knife, the rest of the entire slicer must be fully cleaned, sanitized and left to air dry
before reattaching slicer parts and using the slicer.
11. Soak a clean cloth in a mild detergent and warm water solution. Ring out excess water from cloth. With the slicer
table completely closed, wipe the slicer table off by starting at the knife and pulling towards you. Never wipe the
slicer table towards the knife. Spray or wipe a sanitizer on the table and allow it to air dry.
12. With a clean cloth soaked in mild detergent, wipe down all remaining surfaces of the slicer to remove any food,
debris and grease/oil. Use a nylon brush to scrub difcult areas. Use a clean, wet cloth to rinse the entire slicer.
Finish by spraying sanitizer on all surfaces and then let air dry.
REINSTALL REMOVABLE PARTS
After cleaning, sanitizing, and allowing the parts to air dry, they must be reinstalled.
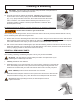
BE ALERT. The slicer knife is exposed. Always be aware of the placement of your
hands/ngers in relationship to the knife.
1. Carefully reinstall the slice deector.
2. Reinstall the knife cover. Place the knife cover over the knife, centering it on the knife hub.
Then, while holding the knife cover in place with one hand, begin turning the knife cover
release knob clockwise with your other hand until the knife cover is securely into place.
NOTE: NEVER operate the slicer with the knife cover removed.
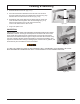
3. Reinstall the knife sharpener. Attach it to the top of the slicer and secure it with the knife
sharpener release knob (Fig 12-4). Note: DO NOT use the sharpener with wet stones.
IMPORTANT: Before operating the slicer, the knife sharpener must be
in place and secure.
Figure 12-1
Figure 12-3
Figure 12-4