
C9, C10, C12 NEW C Series Chefmate Slicer Manual (NSF 2010 Cert)


Page 15
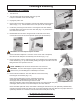
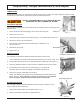
SHARPENING THE KNIFE - (Regular Procedure)
1. Plug in and select the start button on the slicer.
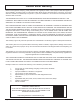
2. Push the grinding stone button #1 (Fig. 15-1) and the honing stone
button #2 at the same time so both stones make contact with
the knife. Maintain pressure on the buttons for 5-10 seconds.
TURN SLICER OFF before inspecting.
SHARPENING THE KNIFE - (Extended Procedure)
NOTE: Use the extended procedure if the regular sharpening procedure
does not produce satisfactory results.
1. Start the slicer.
2. Push the grinding stone button #1 (Fig. 15-1) so the stone sharpens the back side of the knife. Maintain pres
sure on the button for 30 seconds.
3. Push the grinding stone button #1 (Fig. 15-1) and the honing stone button #2 at the same time so both stones
make contact with the knife. Maintain pressure on the buttons for 5 seconds.
TURN SLICER OFF before inspecting.
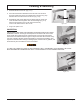
AFTER SHARPENING
1. Turn the slicer off and unplug the power cord.
2. Loosen the sharpener release knob.
3. Rotate the sharpener and place it back in its stored position.
4. Tighten the sharpener release knob (Fig. 15-2).
5. Clean and sanitize the entire slicer as described on pages 10-13.
6. Reinstall the food chute and plug the power cord in.
IMPORTANT: Before operating the slicer, the knife sharpener must be in place and secure
Knife Sharpening
Figure 15-1
Figure 15-2
#1
#2