
Installation Instructions

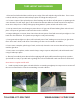

TURF LAYOUT AND SEAMING
1. Place turf on the nished base and line up one edge of the turf with the edge of the base. If no seam is
needed, stake the perimeter with landscape spikes and begin the inll process.
2. If a seam is required, line up both pieces of turf making sure the bers of both pieces are pointing in the
same direction. Use turf super glue, or PL Premium Construction Adhesive found at most home improve-
ment stores. May also use a butyl sealing tape along with 5-6” spikes on both side of the seam.
3. Line up vertical seam, not allowing any more than a 1/8” gap, cut o extra backing from each side and
place a 24” piece of geotextile on the stone base to be seamed to.
4. Using marking pen or crayon, draw a line where the two pieces of turf will meet and spread glue 3-4” on
both sizes of marked line. Use spatula to spread glue evenly and smoothly.
5. Once geotextile and glue is in place, roll back each piece of turf, making sure not to bury or glue down
bers. Once turf is down, walk down seam making sure there are no wrinkles or bubbles.
6. Once seam is complete, place bags of sand, end to end, down the seam to insure the turf stays in place
until the glue dries.
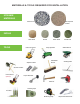
7. Once seams are complete, cut the outside shape, using a carpet or utility knife, and nail down the turf
using 6” landscape spikes.
8. After turf is installed, power broom before applying inll. Apply inll onto turf using a drop spreader.
Spread inll as evenly as possible with a grading rake or broom until inll settles into the base of the turf.
Note: Never use regular sand for inll.
9. Hand or power broom again so that the blades are standing straight up. Use carpet scissors to trim o
the excessive turf blades. Clean the surrounding area with a blower.
TOLL FREE: 877-SYN-TURF WWW.GLOBALSYNTURF.COM