MC508 / MC508B
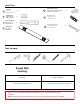
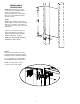
List of Parts Cabinet 1 Gabinete Bâti de l’armoire 2 Soporte superior Support supérieur A x1 Top Bracket Side Mirror Screw x4 Tornillo para el lateral del espejo Vis pour miroirs latéraux Wall Anchor x2 B Anclaje de pared Cheville murale x5 Bottom Bracket 3 4 Soporte inferior Support inférieur Side Mirror Side Mirror Miroir latéral x1 Mounting Screw C x2 Tornillo de montaje Vis de montage x5 Tools Needed Rough Wall Opening Overall Size Rough Wall Opening 19-1/4 in(W) X 25-1/4 in.
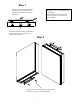
Step 1 Measure and mark two bottom mounting holes on the wall corresponding to the Use a 1/4 in. (6 mm) drill bit for drywall anchor installation. Use a 1/8 in. (3mm) drill bit for direct stud installation. pre-drilled hole locations in the bottom mounting bar. NOTE: If installing into a material other than drywall or into stud, consult a professional for proper installation. Draw horizontal line connecting the two bottom marked location.the line should to be level. adjust to level if necessary.
Step 3 Install the top bar hanger with the same way as the bottom bar hanger. follow the mounting instruction sider for the adjustable shelyes , unscrew and adjust the position of shelf directly and then tighten the screw for mixed.
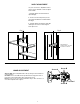
RECESS MOUNT INSTRUCTIONS NOTE: Rough opening is not an exact measurement. The extra space allows cabinet to be inserted into the opening. Add shims to level and tighten space if necessary. Additional framing might be required. STEP 1: NOTE: Before cutting the rough opening, check for pipes, electrical cables, or heating ducts. If it is required to remove part of stud, make sure that the wall is not a load bearing wall. Prepare the opening in the wall for the cabinet body.
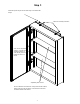
SHELF ADJUSTMENT For your convenience, adjustable shelves have been pre-installed. In order to adjust shelf location: 1. Carefully slide the shelf out from shelf clips. See fig.1. 2. Loosen each shelf clip screw (two for each shelf) and slide to the desired location. See fig 2. 3. Carefully slide the shelf into the shelf clips making sure shelf is level and retighten shelf clip screws. fig. 2 fig.