Installation and Operating Instructions UPRIGHT COOKERS This cooker must be installed by an authorised installer. The enclosed installation check list must be completed and signed off by the installer with the installers licence number recorded to activate warranty.
TABLE OF CONTENTS 2 SAFETY PRECAUTIONS Safety Precautions page 2 Safety Hints and Usage Tips page 3 Operation of Hob page 4 Gas Burners page 4 Electric Cook Top page 4 Using the Oven page 5 Gas oven mode page 5 Make sure all plastic has been removed before use. Some models have trays with a protective coating; make sure the plastic coating has been removed. To make the plastic film easier to remove we suggest using a Stanley knife to trim along joints and edges before peeling back the film.
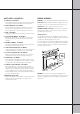
SAFETY HINTS & USAGE TIPS GENERAL WARNINGS 1) OVEN DOOR - ALL MODELS Keep children away from the glass oven door while cooking is in progress: if touched, the glass could cause burns. WARNING avoid touching the heating element inside the oven. 2) DROP DOWN DOORS - ALL MODELS Don’t let children sit down or play with the oven door. Do not use the drop down door as a stool to reach above cabinets. Do not put any weight on oven door.
OPERATION OF HOB GAS BURNERS The combination of high-speed burners with those of a standard type allows all types of cooking to be achieved. In case of ignition malfunction or electricity failure a match can be used to ignite the burners. Strike a match and place it close to the selected burner. Depress the corresponding control knob and turn it anti clockwise to maximum flame.
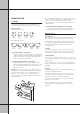
USING THE OVEN GAS OVEN The oven is equipped with a gas thermostat. Its purpose is to keep the temperature as a constant heat. The oven is fitted with electronic spark ignition and a safety shut off device. Lighting the Oven First remove grill tray and open oven door Removing and installing the oven shelves 1. Slide the oven shelves towards you until they reach the front stop. 2. Tilt them up at the front to clear the side supports and lift them clear. 3.
MULTIFUNCTION ELECTRIC OVEN MODE Multifunction Electric Oven - some models Remove grill tray. Choose a function on the selector then position the thermostat knob to desired temperature & wait until the thermostat indicator light goes off, then introduce the food to be cooked. Below is a description of each of the functionsOven light - the oven light switches on and will stay on as long as the oven is in operation. Defrosting - the fan switches on without any heating.
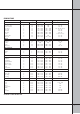
COOKING TABLE Dish Shelf Position (1 = Top) Cakes Chocolate Cake Cream Caramel Cup Cakes Fruit cake Jam tarts Nut Cake Scones Sponge Cake Swiss roll Static Fan oven 2 3 1 3 2 3 1 2 2 2 2 1 2 2 2 1 2 2 3 2 3 3 3 3 2 3 3 3 2 3 3 Temperature Degrees C Static 180 130 190 175 185 190 190 195 195 - Cooking Time in minutes Fan oven 190 150 200 190 200 200 230 210 200 180 130 180 – 190 165 – 180 185 – 200 180 – 190 180 – 190 185 185 – 200 35 - 40 30 - 35 18 - 20 (35 cakes) 35 - 45 40 - 50 40 - 45 17
Notes: • • • • • The information provided is purely a guideline. Modify to suit experience, eating habits and personal taste. The times indicated in the table do not include preheating of the oven, which is always recommended. The time and temperature indicated refer to average quantities of food: meats 1/1.5kg, dough for confectionery, pizza, bread 0.5/0.8kg.
TIMERS the display and the clock will advance minute by minute. The clock has a 24-hour display. SETTING THE MINUTE COUNT DOWN TIMER 1. Press the “TIMER” button. 2. Set the countdown time you want by using the “-” or “+” buttons. You will see the time of day and the timer symbol on the clock display. 3. Press the “TIMER” button briefly to check for time remaining. You will see the set time briefly before the time of day is displayed again. 4. To stop the beeper, press the “TIMER” button.
3. To return the appliance to manual operation press the “COOK” and “STOP” buttons together. TO CHECK YOUR COOKING SETTINGS 1. Press “COOK” button. The cooking duration will show on the timer display. 2. Press “STOP” button. The finish time will be display on the timer. TO CANCEL YOUR COOKING SETTINGS 1. Press the “COOK” and “STOP” buttons together to revert back to manual operation.
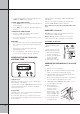
DI/ML COOKER SERIES DOOR REMOVAL AND INSTALLATION INSTRUCTIONS The new DI and ML series of Glem and Emilia cookers have the latest oven door hinge design technology from Glem Gas. For the removal and re-installation of the oven door with the new hinges please follow these procedures. STEP 3. REMOVE THE DOOR The door removal has to be done with the door open at an angle where there is 150mm gap at the top. THIS IS IMPORTANT OPEN 150 mm STEP 1 OPEN THE DOOR FULLY LIFT UP PULL 1.
OPERATION OF THE TOUCH CONTROL PROGRAMMER – GLEM ML COOKER MODELS ONLY SETTING THE MINUTE COUNTDOWN TIMER - The minute countdown timer works independently of the oven and is handy for checking time periods for all cooking tasks. 1. Press MENU and hold down until the screen changes and then let go. 2. Set the countdown time you want by pressing the “-” or “+”. The time is in minutes not seconds. 3. There will be a beep and the timer is set.
PROGRAMMING THE OVEN TO SWITCH OFF AT A CERTAIN TIME OF DAY - Sometimes it is handy to set the time of day you want to finish cooking such as heating a casserole for dinner. This feature allows you to set the length of time you want the oven to run and the time of day when you would like the oven to turn off. 1. Press and hold MENU and then press again. The display shows “DUR” (for duration). 2. Press + to set the desired cooking time. 3. Press MENU once to show “END” in the screen.
CLEANING AND MAINTENANCE WARNING: the oven and hob must be kept clean, as a build up of fat constitutes of a fire risk 1) Cleaning of Stainless Steel - All models In order that your cooker retains its new appearance, care should be taken to protect the stainless steel finish. Never use gritty or abrasive sponges. We highly recommend stainless steel cleaners and protectors.
INSTALLATION - GENERAL It is recommended that the adjacent kitchen surfaces should be capable of withstanding temperatures of 100°C. 1. Location of gas inlet Bottom rear of upright cooker: 100 mm from either LH or RH side 200 mm from base without legs installed 2. Electrical connection Rear of upright cooker: Other models: 200 mm from LH side (as viewed from front) 20 mm from base without legs installed Connection is by means of flexible cord and plug. 3.
4. The upright cooker must be earthed. Connect the upright cooker to a properly earthed and rated power socket, as appropriate. 5. The flexible cord of the upright cooker must not be subject to direct heat and must be positioned after installation so that its temperature does not exceed 75°C. IMPORTANT: If a power socket needs to be installed or relocated, the work must be done by a licensed electrician.
FINAL CHECK • If the pots are sooting up underneath. • If the burners are extinguished by opening and closing the oven door. • If the burners fail to ignite properly. • If the burners fail to remain alight. • If the electrodes constantly click when burners are alight. Inj Diam 1.70 1.55 1.55 1.18 0.90 1.41 1.75 GAS CHECKS AND ADJUSTMENTS - IGNITER OPERATION 13.0 11.5 11.5 7.0 4.0 9.0 14.5 First shut off the gas to the appliance.
INSTALLER’S CHECK LIST Model Number You must test the cooker after installation before you hand it over to the customer. You must have a manometer and a connecting tube.
PRODUCT WARRANTY Thank you for choosing a Glem Gas Appliance, the purchase of this appliance is an important investment in your home and so to protect your investment we urge you to complete the registration card attached, please return it immediately. The benefits conferred by this warranty are in addition to all other conditions and warranties in respect of this product which the consumer may have under the Trade Practices Act 1874 of the Commonwealth of Australia and/or similar State or Territory Laws.
GLEM GAS AUSTRALASIA PTY LTD Unit 26, 10 Straits Avenue South Granville, NSW 2142 Mailing address: PO Box 63, Blaxcell PO South Granville 2142 Phone: (02) 9721 2755 • Fax: (02) 9721 2766 ABN 16120580412 • www.glemgas.com.