
Installation Guide


6
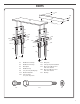
If not already installed, screw in the four leveling legs (P6).
The leveling legs have a flat side designed for use with an
adjustable wrench, if needed.
IMPORTANT: To install the leveling legs, turn clockwise a
minimum of 1½" (3.8 cm), or 20 full turns. Further adjustment
can be made 3/4" (19.1 mm) up or down from this position or
until the leveling leg cannot be turned any further against the
bottom of the inner leg (P2).
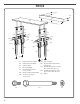
8. Attach the leveling legs
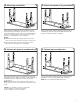
Inner Leg Height Adjustment
NOTE: Adjust this workbench upside down according to the illustrations. Be sure that the workbench top is flat on the floor and the legs
are in the air.
Before setting the workbench upright, verify that the same
number of adjustment holes are visible on each leg to ensure
that the workbench will be level. Align the adjustment holes
in the inner leg (P2) with the adjustment holes in the outer leg
assembly (P1) at the desired height of the workbench.
Insert a 5/16" (8 mm) hex-head bolt (F18) and washer (F19)
and secure with a wingnut (F17) and washer (F20). Be sure the
hex-head bolt aligns with the hex-shaped adjustment hole.
Repeat for each leg.
NOTE: To minimize multiple adjustments during assembly,
make sure the adjustment holes are aligned at the same
desired height for all the legs.
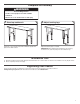
2. Attach leg assemblies1. Align adjustment holes
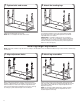
Tighten all remaining bolts and screws.
NOTE: Do not overtighten the bolts and screws.
7. Tighten bolts and screws