
Installation Guide


3
INSTALLATION INSTRUCTIONS
Prepare the Wall
Panels can be mounted directly to wooden studs that are attached to
masonry wall, through drywall into wooden studs, or to bare wooden
studs. If the mounting surface is not flat, the walls may need to be
shimmed.
Masonry Block/Poured Concrete Wall
Before you can install the panels on poured concrete or masonry
block walls, you must install 2" x 4" wooden studs to the wall with
the 4" side against the wall. The wooden studs must be installed over
the entire area to be covered by the GearWall
l®
panels. This provides
a level surface on which to mount the panels.
1. Install the first stud at the starting edge of the desired coverage
area to act as a guide.
■ Drill a hole through the stud and into the wall surface. Follow
masonry screw manufacturer’s instructions for proper
installation.
■ For best results use a hammer drill and masonry bit.
NOTE: For extra hold, you may choose to put construction
adhesive on the stud before attaching it to the wall.
■ Secure the stud to the wall by placing ¹⁄₄" x 2³⁄₄" masonry
screws every 18" (45.72 cm).
2. Use this stud as your guide. Measure 16" (40.64 cm) from the
corner and snap a vertical chalk line using a chalk line with a
plumb bob. Snap a chalk line every 16" (40.64 cm) from this
point.
3. Align the center of the stud with the chalk line. Attach the
remaining studs to the wall as you did in Step 1.
Drywall over Wooden Studs
1. Locate all wooden studs and mark the wall(s).
2. Locate electrical wiring and mark the wall(s).
Wooden Studs and Drywall over Wooden Studs
Full Wall Installation:
1. Snap a level chalk line at a convenient height on the wall(s).
2. Measure from the chalk line to the ceiling and determine the
lowest point of the ceiling along the wall.
3. Starting from the lowest point of the ceiling, measure down to the
floor. Round the measurement down to the nearest foot and
mark. Snap a level chalk line ¹⁄₄" (0.63 cm) below the mark.
Repeat step for remaining walls.
NOTE: Be sure to take into account any ceiling height variations.
Partial Wall Installation:
1. Snap a level chalk line 12" (30.48 cm) above the desired height of
the bottom of the wall.
Outlets and Switches
Locate any cutouts, measure and cut the panels prior to beginning
the installation. Electrical outlets should be recessed and trimmed in
the following manner, using GearWall
®
trim.
1. Measure the outlet box or switch box location to edge of the
cover.
2. Cut the GearWall
®
trim to the correct dimensions.
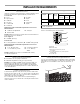
3. Notch the top and bottom
trim as shown so the fit is snug.
4. Place the trims around the outlets as you install the panels.
A. Masonry screws
B. Wooden stud
A
B
A. Top trim
B. Notch
C. Side trim
D. Bottom trim
A
C
D
B