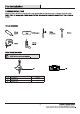
= GLACIER BAY Model #4310F USE AND CARE GUIDE TOP MOUNT DOUBLE BOWL KITCHEN SINK Questions, problems, missing parts? Before resuming to the store, call Glacier Bay Customer Service 8 a.m. 7 p.m., EST, Monday Friday, 9 a.m. 6 p.m., EST, Saturday 1-855-HF-GLACIER THANK You We appreciators the trust and confidence you have placed in Glacier Bay through the purchases of this sink. We strive to continually creates quality products designed to enhance your home.
Top mount Installation Care and Cleaning . Before installing this sink, read this instruction manual carefully. It contains important information conceding the saga installation, operation, and maintenance of your sink. Rental this manual for future use. In the event of sale, transfer, or relocation, ensure this manual remains with the sink. LIMITED LIFETIME WARRANTY This limited lifetime warranty is extended to the original purchaser of this sink.
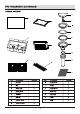
PLANNING INSTALLATION Compare all parts to the Hardware Included and Package Com tents lists and verify that all parts are included. Inspect all parts for damage. If there are missing parts or visible damage ta the sink, do net install and contact the Customer Service Team at 1-855-GLACIER. TOOLS REQUIRED Drill and drill bit Mounting clip Colander feet Phillips screwdriver Hammer Please contact 1-855-HF-GLACIER for further assistance.
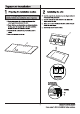
1 Preparing the installation location 2 Installation the sink OO Insert the clips Into the channels. See the diagram below for recommended clip placement. O Insert the sink into the hole. Rotas the clip. Tighten the O i necessary, remove the old sink and disconnect the clips to secure the sink. Walter supply lines underneath the sink. [0 Apply a Gamow bead of silicone adhesive sealant evenly all OJ I your sink does not already have an existing installation around the sink flanges.
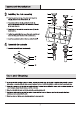
3 installing the drain assembly [1 Place the gasket (J) on top of the other drain hole in the sink (B), followed by the strainer bowl (1). [1 From underneath the sink (B), position the double lip seal (K) with grooves facing up on the drain holes, followed by the waste bowl (L). [1 From the top of the drain hale, screw the screw (H) into the waste bowl (L). [1 Position the gasket (M)at the base of the wast bowl (L) and screw the fitting (N) to the bass of the wast bowl (L).
P24 GLACIER BAY. Questions, problems, missing parts? Before returning to the store, call Glacier Bay Customer Service p.m., EST, Monday-Friday, 9 a.m. 6 p.m., EST, Saturday 1-855-HF-GLACIER Retain this manual for future use.