Item #1000 017 512 Model #2133NSHD USE AND CARE GUIDE PREMIUM POLE CADDY Questions, problems, missing parts? Before returning to the store, call Glacier Bay Customer Service 8 a.m. - 6 p.m., EST, Monday - Friday 1-855-HD-GLACIER HOMEDEPOT.COM THANK YOU We appreciate the trust and confidence you have placed in Glacier Bay through the purchase of this perium pole caddy. We strive to continually create quality products designed to enhance your home.
Table of Contents Table of Contents. . . . . . . . . . . . . . . . . . . . . . . . . . . . . . . . . . . . 2 Safety Information. . . . . . . . . . . . . . . . . . . . . . . . . . . . . . . . . . . 2 Warranty. . . . . . . . . . . . . . . . . . . . . . . . . . . . . . . . . . . . . . . . . . . 2 Pre-Installation. . . . . . . . . . . . . . . . . . . . . . . . . . . . . . . . . . . . . . 3 Planning Installation . . . . . . . . . . . . . . . . . . . . . . . . . . . . . . . . 3 Package Contents . . . . . . . . .
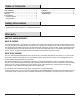
Pre-Installation PLANNING INSTALLATION □□ Please identify all the parts and hardware pieces before you begin. □□ When laying out the parts, place them on a soft surface to prevent scratching. TOOLS REQUIRED Hacksaw HARDWARE INCLUDED NOTE: Hardware shown to actual size. CC BB AA DD Part Description Quantity AA Plastic T-cap 2 BB Plastic end cap with hole 1 CC Soft vinyl end cap 1 DD Tape strips 3 3 HOMEDEPOT.COM Please contact 1-855-HD-GLACIER for further assistance.
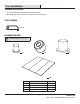
Pre-Installation (continued) PACKAGE CONTENTS A B E C E F C G D Part Description Quantity A 1/2 in.
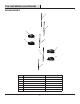
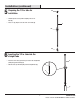
Installation (continued) 1 Measure distance to ceiling tub ledge NOTE: No matter the distance, tubes (A) and (B) are ALWAYS used. □□ Measure the distance between the tub ledge or the shower stall floor to the ceiling to the nearest inch. □□ Refer to the Troubleshooting section at the end of this manual to know what tubes (C) and (D) that are needed. shower stall floor 2 tapered end Connecting the shelves to the tube F NOTE: Assembly shown for a 92 - 97 in. installation.
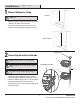
Installation (continued) 3 Connecting the two tubes E □□ Place the untapered end of the tube (C) with the two shelves (E) on it into the tapered end of the other tube (C) with the shelves (F and G) on it. C E F C G 4 Connecting the straight tube to the top shelf assembly □□ Place the straight tube (with spring packed inside) (B) on top of the long tapered tube (C).
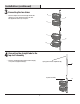
Installation (continued) 5 Preparing the 1/2 in. tube for installation AA □□ Slide the plastic end cap with hole (BB) on the 1/2 in. tube (A). □□ Place a T-cap (AA) on each end of the 1/2 in. tube (A). A BB AA 6 Inserting the 1/2 in. tube into the straight tube A □□ Place the 1/2 in. tube (A) into the open end of the straight tube (with spring packed inside) (B). □□ Slide the end cap with hole (BB) over the straight tube (B). BB B B 7 HOMEDEPOT.
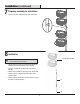
Installation (continued) 7 Preparing assembly for installation □□ Place the tape strips (DD) around the seams of the tubes. DD 8 Installation bottom shelf assembly WARNING: Injury may occur if you do not install the top of the assembly onto the ceiling first. □□ Slip the tapered end of the short tapered tube (D) into the untapered end of the bottom tube of the assembly. □□ Place the soft vinyl end cap (CC) on the short tapered tube (D).
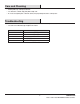
[Heading goes here] Care and Cleaning □□ Cleaning with a dry cloth may be sufficient. □□ For other stains or marks, wipe gently with a damp cloth. □□ Do not use strong detergents or abrasive cleaners; they may damage the surface of this product. Troubleshooting □□ Measure the distance between the tub ledge or the shower stall floor to the ceiling to the nearest inch. □□ See chart to know what tubes (C) and (D) that are needed. Distance to Ceiling Use Tubes (C), (D) as Needed 72 - 75 in. (C) and (D) 75.
Questions, problems, missing parts? Before returning to the store, call Glacier Bay Customer Service 8 a.m. - 6 p.m., EST, Monday - Friday 1-855-HD-GLACIER HOMEDEPOT.COM Retain this manual for future use.
Item N.°1000 017 512 Modelo N.°2133NSHD GUÍA DE USO Y CUIDADO BARRA ORGANIZADORA PREMIUM ¿Tiene preguntas, problemas, le faltan piezas? Antes de regresar a la tienda, llame al Servicio al Cliente de Glacier Bay de 8 a.m. — 6 p.m, Hora Estándar del Este, de lunes a viernes 1-855-HD-GLACIER HOMEDEPOT.COM GRACIAS Agradecemos la confianza que ha depositado en Glacier Bay a través de la adquisición de esta barra organizadora Premium.
Tabla de contenido Tabla de contenido. . . . . . . . . . . . . . . . . . . . . . . . . . . . . . . . . . . 2 Información de seguridad . . . . . . . . . . . . . . . . . . . . . . . . . . . . . 2 Garantía. . . . . . . . . . . . . . . . . . . . . . . . . . . . . . . . . . . . . . . . . . . 2 Pre-instalación. . . . . . . . . . . . . . . . . . . . . . . . . . . . . . . . . . . . . . 3 Planificación de la instalación. . . . . . . . . . . . . . . . . . . . . . . . . 3 Contenido del paquete. . . . . . . . . . . . .
Pre-instalación PLANIFICACIÓN DE LA INSTALACIÓN □□ Identifique todas las piezas y las piezas de tornillería antes de comenzar. □□ Al esparcir las partes, colóquelas sobre una superficie suave para evitar que se rayen. HERRAMIENTAS NECESARIAS Sierra para metales ELEMENTOS INCLUIDOS NOTA: La tornillería se ilustra en su tamaño real.
Pre-instalación (continuación) CONTENIDO DEL PAQUETE A B E E C F C G D Pieza Descripción Cantidad A Tubo de 1/2 pulg.
Instalación (continuación) 1 Mida distancia al cielorraso reborde de la bañera NOTA: Cualquiera sea la distancia, SIEMPRE se usan los tubos (A) y (B). □□ Mida la distancia entre el reborde de la bañera o el piso del cubículo de la ducha hasta el cielorraso redondeando a la siguiente pulgada. □□ Vea la tabla para saber cuáles son los tubos (C) y (D) que son necesarios.
Instalación (continuación) 3 Conexión de los dos tubos E □□ Coloque el extremo no ahusado del tubo (C) con las dos repisas (E) este dentro el extremo ahusado del otro tubo (C) con las repisas (F y G) sobre este. C E F C G 4 Conexión del tubo recto al ensamble de repisa superior resorte embutido dentro del tubo recto (B) □□ Coloque el tubo recto (con resorte embutido en su interior) (B) sobre la parte superior del tubo largo ahusado (C).
Instalación (continuación) 5 Preparación para instalación del tubo de 1/2 pulgada AA □□ Deslice la cubierta terminal de plástico con orificio (BB) sobre el tubode 1/2 pulgada (A). □□ Coloque un tapón (AA) en cada extremo del tubo de 1/2 pulgada (A). A BB AA 6 Inserción del tubo de ½ pulgada en el tubo recto A □□ Coloque el tubo de ½ pulgada (A) dentro del extremo abierto del tubo recto (con resorte embutido en su interior) (B).
Installation Instalación (continued) 7 Preparando el montaje para la instalación □□ Coloque las tiras de cinta (DD) alrededor de las uniones de los tubos. DD 8 Instalación ensamble de repisa inferiory ADVERTENCIA: Se pueden causar lesiones si no instala la parte superior del ensamble primero sobre el cielo raso. □□ Deslice el extremo ahusado del tubo ahusado corto (D) dentro del extremo que no está ahusado del tubo inferior del ensamble.
[Headingygoes here] Cuidado limpieza □□ Limpiar con un paño seco puede ser suficiente. □□ Para otras manchas o marcas, limpie suavemente con un paño humedecido. □□ No use detergentes fuertes o limpiadores abrasivos; pueden dañar la superficie de este producto. Solución de problemas □□ Mida la distancia entre el reborde de la bañera o el piso del cubículo de la ducha hasta el cielorraso redondeando a la siguiente pulgada. □□ Consulte la tabla para saber qué tubos (C) y (D) que se necesitan.
¿Tiene preguntas, problemas, le faltan piezas? Antes de regresar a la tienda, llame al Servicio al Cliente de Glacier Bay de 8 a.m. — 6 p.m, Hora Estándar del Este, de lunes a viernes 1-855-HD-GLACIER HOMEDEPOT.COM Conserve este manual para uso futuro.