Installation Instructions Compact One Piece Toilet 6636 Contact our Customer Care Center · USA:(+1)347-368-7521 (GMT-8/ 9:30-18:30/ Mon-Fri) · Office Address: 12100 W 52nd Ave, Wheat Ridge, CO, 80033, United States · www.givingtreehome.
READ ALL INSTRUCTIONS BEFORE UNPACKING THE PRODUCT · 2 people are required to lift and during entire installation of this product · Installation of this products by an inexperienced installer may result personal injury! · We reserves the right to change, update, modify, alter, redesign this manual/ product or its policies without prior notice! · We shall not be liable for any injuries or property damages in connection with this product during installation or use of this product! · We are not responsible for
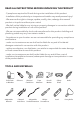
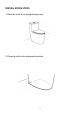
PARTS LIST Bowl with lid x1 Wax Ring x1 Plastic washer x2 Toilet Seat Set x1 Mounting Screw x2 bolt cap decoration x2 The plastic piece x2 Expansion screw x2 T-Bolt Nuts and Washers x2 PRODUCT SIZE 2
REMOVE OLD TOILET IMPORTANT! Shut off main water supply prior to installation! 1. Shut off water supply line. If you do not have shut-off valve near the toilet shut off main water supply line. 2. Flush the old toilet and make sure that tank is empty. 3. Disconnect and remove water supply line connected to the toilet's tank. 4. Remove old toilet, bolts, nuts from the closet flange. 5. Clean closet flange area from old wax ring and putty sealant using putty knife from the base area. 6.
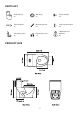
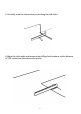
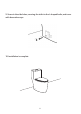
INSTALLATION STEPS 1. Place the toilet in the designated position 2.
3. Vertically mark the intersection points along the side holes 4. Move the toilet aside and measure the drilling hole locations, with a distance of 2.95 inches from the intersection points c 5in 2.
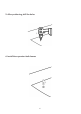
5. After positioning, drill the holes → 6.
7. Tighten the L-shaped bolts, positioning them as close as possible to the left and right sides of the toilet, with adjustable positioning 8.
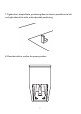
. Screw in the side holes, securing the toilet to the L-shaped bolts, and cover with decorative caps → → 10.
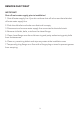
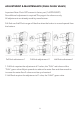
ADJUSTMENT & MAINTENANCE (DUAL FLUSH VALVE) Important Note: Flush GPF amount is factory set. (1.6GPF/0.8GPF) No additional adjustment is required.This page is for reference only. All adjustments are already made by manufacturer. Full flush and half Flush range will decline when the button is moved upward from the bottom. Full flush adiustment-1 Full flush adjustment -2 Half flush adiustment-1 1. Full flush requires the adjustment of 2 valves, the “FULL” red valve and the “FULL” green valve.
TROUBLESHOOTING If the rod is too short, please re-adjust it (outward rotation). If the rod is too long please cut-off the extra length and re-adjust it. MAINTENANCE & CARE Use soft sponges or soft-cloths to clean the surface. Always rinse thoroughly any cleaning solutions immediately after cleaning. Do not any chemical remain on the surface for extended periods of time. IMPORTANT! DO NOT USE: Abrasive cleaners such as: acid, ammonia, bleach, and simmilar solutions.