M2A® Patency System User Manual Rev. 1.
COPYRIGHT This manual is the property of Given Imaging Limited and may not be transferred or reproduced in any form without the written permission of Given Imaging Limited. This manual is protected under the copyright laws of Israel. Copyright © 2003, Given Imaging Limited. All rights reserved.
Table of Contents Chapter One Introduction ................................................................................ 1 Introduction...................................................................................................... About this Manual ........................................................................................... Related Documents ......................................................................................... Conventions.........................................
Chapter Four Using the M2A® Patency System ...........................................19 Overview ........................................................................................................ Preparing the Patient .................................................................................... Preparing for the Examination .................................................................... Preparing the Scanner ................................................................................
Chapter One Introduction Introduction The M2A Patency System is a simple and easy to use device for verifying the patency of the GI tract. It may assist you in various situations such as the use of the M2A® Capsule in patients with suspected strictures. The M2A Patency System consists of the following components: • M2A Patency Capsule • M2A Patency Scanner • TesTag (interference tester) Once the patient ingests the M2A Patency Capsule it is propelled through the GI tract by normal peristalsis.
About this Manual This manual describes the M2A Patency System and instructs the user on how to use the system. The manual is comprised of the following chapters: Chapter 1: Introduction Chapter 2: M2A Patency System Overview Chapter 3: Describes the conventions of the user manual and how to contact Given Imaging Ltd. Describes the system, provides the indications and contraindications, and the system specifications. Describes how to setup the system.
Conventions Convention Explanation Bulleted List One step procedure or a list of items. Numbered List A multi step procedure. You need to perform the procedure step by step according to the order of the steps. ! Warning Note ! Given Imaging Ltd.
Contacting Given® Imaging Information and Technical Support for the M2A Patency System are available from: Worldwide Support Company Headquarters support@givenimaging.com Given Imaging Ltd. POB 258 Yoqneam, Israel 20682 Tel: +972-4-909-7777 Fax: +972-4-959-2466 info@givenimaging.com Germany & European Operations Authorized Representative in the EU Given Imaging GmbH Borsteler Chaussee 47 D-22453 Hamburg Germany Tel: +4940-513300-0 Fax: +4940-4606-9611 infode@givenimaging.
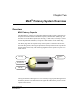
Chapter Two M2A® Patency System Overview Overview M2A Patency Capsule The M2A Patency Capsule is an ingestible and dissolvable capsule comprised of a body that surrounds a small inner Radio Frequency Identification (RFID) tag. It is the same size of the M2A Capsule (26 mm long, 11 mm wide). The body is coated with an impermeable membrane, except for a small window on the Timer Plug. The Timer plug seals the capsule’s body.
After ingestion, the M2A Patency Capsule is propelled by peristalsis through the gastrointestinal tract. Detection of an RF signal three days following ingestion means that the capsule is still retained in the GI tract. This may indicate a problem with the patency of the GI tract. In case the capsule is retained in the GI tract even longer, a disintegration process begins, to enable normal excretion of the resulting small fragments.
M2A Patency Scanner The M2A Patency Scanner is an external transmitting/detecting unit that transmits and detects RF signals. The M2A Patency Scanner is a hand-held, battery-operated device (eight 1.5v batteries) with a self-testing mechanism. The Patency Scanner includes a processor, transmitter, receiver, an audible indicator and LEDs for indicating operation and detection of RF signal.
TesTag The TesTag is a plastic rod of 20 cm length. At one end it is equipped with an RFID tag similar to the one in the M2A Patency Capsules, at the other end a suction cap is attached. The TesTag is used to verify the detection range of the Patency Scanner in a given environment.
M2A Patency Scanner Operation When not in use, the Scanner is stored hanging on a hook installed in your office. For further information, refer to Specifications on page 14. To turn on the Scanner, press the ON button. A self-test mechanism checks the functionality of the Scanner. The Power ON LED indicates that the Scanner is ready for use. The Scanner is ON for 30 seconds, during which it transmits and receives signals.
Indications and Contraindications Indications The M2A® Patency System is intended to verify patency of the GI tract. Contraindications The M2A Patency Capsule is contraindicated for use: • in patients with cardiac pacemakers or other implanted electromedical devices • in patients with swallowing disorders Note The main component of the capsule is Lactose (less than xx gr). 10 Given Imaging Ltd.
Warnings A warning indicates a condition that may endanger the patient or the operator. • A negative or normal result obtained by the capsule does not exclude the presence of pathology. • A thorough understanding of the technical principles, clinical applications and risks associated with the Given M2A Patency System is necessary before using this product. Read the entire manual before using the system for the first time.
Cautions A caution indicates a condition that may damage the equipment. • Make sure that only trained personnel familiar with the M2A Patency Capsule and Scanner use them. • Use the M2A Patency Capsule and Scanner only if purchased from Given® Imaging Ltd. Use of other components may void the warranty and may damage it. • Use the Scanner away from operating computer monitors, any large metallic objects and electronic or magnetic cards/badges and remote controls that may contain similar RFID tags.
System Labeling The following table lists the labels attached to various components of the Given® Patency System: Labeling Explanation The M2A® Patency System must be used at a distance from any powerful magnetic fields such as the one created by an MRI. The M2A Patency Capsule is intended for single use only. Attention! Consult the documentation provided with the M2A Patency System. Type BF equipment FCC ID O8PPATENCYSCANNER CE mark C-Tick mark CSA mark Lot number Indoors use only Given Imaging Ltd.
Specifications Note Specifications are subject to change without prior notice and without any obligation to users on the part of the manufacturer. M2A Patency Capsule Physical Dimensions Length: 26 mm, Diameter: 11 mm Weight 3.3gr ± 0.
M2A Patency Scanner Transmission frequency 128 ± 3 KHz Transmission time 30 Sec. 25% Duty Cycle Read cycle 24 ms Read Range < 30 cm Weight 2.3 Kg ± 0.2 Kg General Dimensions 497 mm × 442 mm Housing material ABS + PC (CYCOLOY C2800) Power supply 12 V, 8 AA 1.5V batteries Average Current 200 mA Battery type Lithium L91 from Energizer (or equivalent from other manufacturers) Max Operation time Up to 600 ON cycles Operating temp. 5–50ºC Storage temp.
16 Given Imaging Ltd.
Chapter Three System Setup Before the System Arrives Before the M2A Patency System arrives at your office, prepare the following: • Storage place for the M2A Patency Capsule 10-Pak box. • Space on the wall for hanging the Scanner away from any computer monitor and large metallic items. Hanging the Scanner The Scanner is supplied with a hook to be attached to the wall with two screws. Prior or after using it, hang the Scanner on the hook. Scanner Hook Given Imaging Ltd.
Attaching the Hook to the Wall 1. Select a location on the wall (approx. 40 x 40 cm) suitable for hanging the Scanner. 2. Mark required holes using Part A as a template. 3. Drill two holes. 4. Secure part A of the hook to the wall. 5. Mount part B on top of part A. Part B of Hook Part A of Hook 18 Given Imaging Ltd.
Chapter Four Using the M2A® Patency System Overview On the first day of the M2A Patency Examination, the patient ingests the M2A Patency Capsule. Two days later (48–72 hours), the patient returns to the clinic to check whether or not the M2A Patency Capsule was retained. If the Scanner does not detect the Capsule, the GI tract is patent. If the capsule is retained and the Scanner detects it, the physician may consider performing a fluoroscopy or X-ray the same day, in order to locate the capsule.
The M2A Patency Examination includes the following: • • • • • • • Preparing the patient Preparing the system components Detection/functionality test Dispensing the capsule Releasing the patient Interference testing Scanning of the abdominal area with the Scanner Preparing the Patient Once it is decided that the patient should undergo M2A Patency Examination, verify that the patient does not have any contraindications and obtain the patient’s informed consent.
• The patient is expected to abstain from smoking 24 hours before the examination. The day of M2A Patency Examination • The patient should not take any medication as of two hours before the examination. • When arriving at the clinic, the patient is asked to give his/her informed consent and to go through the patient check-in procedure. After Ingestion • The patient may continue with his/her regular eating habits.
Preparing for the Examination Before the patient arrives, verify that the following equipment and accessories are available: • • • • M2A Patency Capsule M2A Patency Scanner TesTag Glass of water Preparing the Scanner If this is the first time you are using the Scanner, place 8 batteries in their bay. Beware of the correct polarity. Note It is recommended to use 1.5v lithium L91 energizer batteries. Other batteries last for less time and may leak and damage the Scanner. 22 Given Imaging Ltd.
To place the batteries in the Scanner 1. Open the battery bay by pushing the flaps toward the bottom of the Scanner. Push here toward the bottom of the Scanner to release the flap. Battery Bay 2. Insert 1.5V batteries into the battery bay according to the sketch inside. 3. Verify that you placed the batteries according to the correct polarity and that the batteries are fully seated in their place. 4. Close the battery bay and make sure the flap is closed and secured by its clasps.
Testing the Environment for Interference ! Caution Operating the Scanner in the proximity of the following items might reduce the Scanner’s detection range: • Operating monitors - Use the Scanner at least 5 meters away from any operating monitors (Monitors in adjacent rooms, should be turned off.) • Large Metallic objects - Use the Scanner at least 30 cm away from large metallic objects.
4. Press the Power button and make sure that: • The Power LED is ON. If the Power LED turns on, blinks in red for 5 seconds and the Scanner turns off, the Scanner is faulty. • The Battery LED is off. If the Battery LED turns on, blinks for 5 seconds and the Scanner turns off, replace batteries. 5. If the blue Detection LED turns on, the Scanner operates correctly in this environment.
Testing for Interference Power LED turns on Yes Battery LED blinks, Scanner turns off No Replace all eight batteries Yes No Attach TesTag Yes Power LED and Battery LED turn on No Make sure the Scanner operates at least: y 5 meters away from operating monitors y 30 cm away from large metallic objects y 1 meter away from electronic or magnetic cards/badges and remote controls with RFID tags Call Given Customer Support No Detection LED turns on No Repeat the test in a different location until
Checking-In a Patient Make sure the patient has followed the preparation instructions, as discussed on page 20. During this procedure we recommend to obtain and retain the following information: • Patient data – First and Last name, ID number, and physique (Thin, Normal, Stocky or Protuberant Abdomen). • Bowel movement regularities • How often does the patient have a bowel movement: At least once a day At least once every 2 days At least once every 3 or more days.
2. Take the Scanner off the hook and turn it on. 3. Hold the Scanner by its handles with its back facing the capsule, bring it near the capsule, (up to 20 cm) and test detection. If the Detection LED does not turn on, take another M2A Patency Capsule and repeat step 3. If the Scanner detects the new capsule, write down on the back label of the faulty capsule the date and return it to its box. If the Scanner does not detect the second capsule either, contact Given Customer Support. 4.
Releasing the Patient Once the patient has ingested the M2A Patency Capsule, the patient may leave the office. Verify that the patient knows how to fill in the Bowel Movement Activity Form in the Patient Instructions booklet. To discharge the patient 1. Verify that the patient has the Patient Instructions. 2. Schedule another appointment for 2 days later (minimum 48 hours) to check whether the capsule is retained or excreted.
4. Ask the patient to take off heavy clothes such as jackets, coats or sweaters. 5. Ask the patient to stand up. 6. Take Scanner off the hook. 7. Verify that the Scanner is at least 5 meters away from an operating monitor (monitor in adjacent rooms should be turned off) or any metallic objects and turn it on. 8. Verify the following: Power On LED is on. Battery LED is off. 9.
Hold the Scanner as close as possible to the patient and scan all around the abdonimal area in either direction as the arrows indicate. In case the patient has a protuberant abdomen, ask the patient to lie down and scan the abdomen cavity front and back. Make sure the patient does not lie down on a metal table. In case the patient is very large and the Scanner did not pick up a signal, it may be indicated to perform an X-ray to make sure the capsule has left the body. Given Imaging Ltd.
Note If the test lasts longer than 30 seconds, the Scanner turns off automatically. Press the ON button again to resume the operation of the Scanner. 10. At the end of the M2A Patency Examination, discuss the outcome with the patient. 32 Given Imaging Ltd.
Index B N Batteries ................................................ 7 Bowel Movement Activity Form ........... 29 Nausea ................................................ 11 C P F Pacemakers .......................................... 10 Patient, checking-in .............................. 27 Peristalsis .............................................. 6 Pregnancy ............................................ 11 Fluoroscopy ......................................... 19 R G RFID tag ....................
W Worldwide Support ................................ 4 34 Given Imaging Ltd.