
User Manual
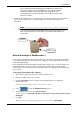
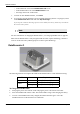
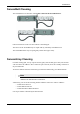

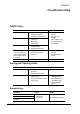
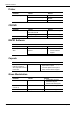
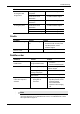
Table Of Contents
- Book 1: Setup & Maintenance
- Table of Contents
- Chapter 1
- Introduction
- Chapter 2
- Setting Up the System
- Setup Requirements
- Given Workstation
- DataRecorder and Cradle
- Storage Space for the PillCam Capsule Box
- Main Platform Components
- Connecting the Components
- Connecting the Given Workstation
- 1. Connect the Mouse cable to the Mouse connector.
- 2. Connect the Keyboard cable to the Keyboard connector.
- 3. Connect the monitor to the Workstation.
- 4. Connect the printer to the LPT connector or to the USB connector, depending on the printer’s connection cable.
- 5. If the Workstation’s voltage setting is manual, verify that the Workstation’s voltage matches the local voltage. If it does not, call Given Customer Support.
- 6. After voltage verification, connect the power cable of the Given Workstation to the electric outlet.
- 7. Connect the power cable of the monitor to the wall electric outlet.
- Connecting the DataRecorder Cradle
- Chapter 3
- Software Installation
- Chapter 4
- Multi-User Setup
- Chapter 5
- Technical Description
- System Labeling
- Essential Performance
- Warnings
- Cautions
- System Specifications
- PillCam SB Capsule
- PillCam SB 2 Capsule
- PillCam ESO 2 Capsule
- PillCam ESO 3 Capsule
- PillCam COLON 2 Capsule
- SensorArray DataRecorder 2
- SensorArray DataRecorder 3
- SB SensorBelt for DataRecorder 2 and DataRecorder 3
- DataRecorder 2 /2C
- Cradle DataRecorder 2
- DataRecorder 3
- Cradle DataRecorder 3
- DC Power Supply
- DataRecorder 3 Memory Card
- RAPID Software
- Guidance and Manufacturer's Declarations
- Chapter 6
- Maintenance
- Chapter 7
- Troubleshooting

73
Index
A
Acknowledge Button
.............................. 8
Automatic Shutdown
DataRecorder
.............................. 4, 8
B
back pannel connectors
......................... 19
Backup Logs. ....................................... 34
Backup, create ...................................... 34
Battery and Capsule Icons ..................... 11
Battery Status ......................................... 8
C
Capsule
storage space
.................................. 18
Troubleshooting ............................. 70
Capsule ID ........................................... 35
CD/DVD
Troubleshooting
............................. 70
CE mark .............................................. 35
connecting the RAPID Booster .............. 18
connecting the RAPID Workstation ....... 20
connectors of back pannel ..................... 19
Cradle ...................................... 6, 12, 18
LED indications ........................ 6, 12
Troubleshooting ............................. 71
Cradle Connections .......................... 6, 13
CSA mark ............................................ 35
D
DataRecorder
................................ 11, 18
DataRecorder 2
Manual Discharge
........................... 65
DataRecorder 2 Kit ................................. 3
DataRecorder 3
Troubleshooting
............................. 71
DataRecorder 3 Kit ................................. 7
DataRecorder 3 LED Indications ............. 9
DataRecorder 3 Memory Card ............... 47
DataRecorder 3 Screen Icons ................. 11
DataRecorder 2 ...................................... 3
DataRecorder 3 ...................................... 7
E
Expiration date
.................................... 35
G
Gastrointestinal tract
.............................. 2
Given Workstation ............................... 18
connecting ..................................... 18
Controlling access .......................... 15
voltage .......................................... 18
I
installing RAPID C2
............................ 23
K
KVM Switch
....................................... 17
L
Lot number
.......................................... 35
Low Signal .......................................... 72
M
Main screen
RAPID C2 Installation CD
............. 23
N
Navigation Buttons
................................ 8
Navigation Buttons Legends ................. 12
Non-ionizing radiation ......................... 35
O
outlet
................................................... 17
P
Password
............................................. 32
Password, change ................................. 33
password, new ..................................... 32
PillCam ESO 2 Capsule ........................ 41
PillCam Platform ................................. 17
before it arrives .............................. 17
Pillcam Platform
required space
................................ 17