
User Manual
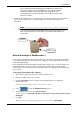
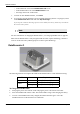
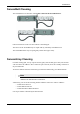

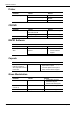
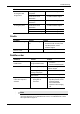
Table Of Contents
- Book 1: Setup & Maintenance
- Table of Contents
- Chapter 1
- Introduction
- Chapter 2
- Setting Up the System
- Setup Requirements
- Given Workstation
- DataRecorder and Cradle
- Storage Space for the PillCam Capsule Box
- Main Platform Components
- Connecting the Components
- Connecting the Given Workstation
- 1. Connect the Mouse cable to the Mouse connector.
- 2. Connect the Keyboard cable to the Keyboard connector.
- 3. Connect the monitor to the Workstation.
- 4. Connect the printer to the LPT connector or to the USB connector, depending on the printer’s connection cable.
- 5. If the Workstation’s voltage setting is manual, verify that the Workstation’s voltage matches the local voltage. If it does not, call Given Customer Support.
- 6. After voltage verification, connect the power cable of the Given Workstation to the electric outlet.
- 7. Connect the power cable of the monitor to the wall electric outlet.
- Connecting the DataRecorder Cradle
- Chapter 3
- Software Installation
- Chapter 4
- Multi-User Setup
- Chapter 5
- Technical Description
- System Labeling
- Essential Performance
- Warnings
- Cautions
- System Specifications
- PillCam SB Capsule
- PillCam SB 2 Capsule
- PillCam ESO 2 Capsule
- PillCam ESO 3 Capsule
- PillCam COLON 2 Capsule
- SensorArray DataRecorder 2
- SensorArray DataRecorder 3
- SB SensorBelt for DataRecorder 2 and DataRecorder 3
- DataRecorder 2 /2C
- Cradle DataRecorder 2
- DataRecorder 3
- Cradle DataRecorder 3
- DC Power Supply
- DataRecorder 3 Memory Card
- RAPID Software
- Guidance and Manufacturer's Declarations
- Chapter 6
- Maintenance
- Chapter 7
- Troubleshooting

Given Imaging Ltd. 69
Chapter 7
Troubleshooting
RAPID Video
Saving and Opening Video
SensorArray
Problem Cause Action
Short Video • Capsule
• DataRecorder Battery
• DataRecorder Mishandling
• Contact Customer
Support
• Send video on
CD/DVD
• Inform Capsule Lot #
• Do not use the same
DataRecorder
Gaps • Capsule
• Interference
• Mishandling
• Physiological
Bad image quality • Stripes in video
• Pixilation/confetti
• Dark/red/orange image
Video shorter than
capsule operating time
without either ingestion
phase images or body
exit images
•Capsule
• DataRecorder Battery
• Interference
• Send video on
CD/DVD
• Contact Customer
Support
No Localization Malfunction of the SensorArray Contact Customer Support
Problem Cause Action
Cannot locate video • Video was not saved in
E:\Videos
• Incorrect patient’s name
Contact Customer Support
Cannot locate findings • Findings were not saved under
patient’s folder
• Findings were saved with the
wrong name
•See Saving Your
Findings in chapter
four of Book 3: Using
the RAPID Software
• Contact Customer
Support
Problem Cause Action
Connector is damaged
• Mishandling
• End of Life
Contact Customer Support
Sensor is torn from its wire
Insulation of the sensor wire is
damaged