
User Manual
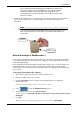
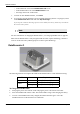
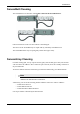

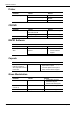
Table Of Contents
- Book 1: Setup & Maintenance
- Table of Contents
- Chapter 1
- Introduction
- Chapter 2
- Setting Up the System
- Setup Requirements
- Given Workstation
- DataRecorder and Cradle
- Storage Space for the PillCam Capsule Box
- Main Platform Components
- Connecting the Components
- Connecting the Given Workstation
- 1. Connect the Mouse cable to the Mouse connector.
- 2. Connect the Keyboard cable to the Keyboard connector.
- 3. Connect the monitor to the Workstation.
- 4. Connect the printer to the LPT connector or to the USB connector, depending on the printer’s connection cable.
- 5. If the Workstation’s voltage setting is manual, verify that the Workstation’s voltage matches the local voltage. If it does not, call Given Customer Support.
- 6. After voltage verification, connect the power cable of the Given Workstation to the electric outlet.
- 7. Connect the power cable of the monitor to the wall electric outlet.
- Connecting the DataRecorder Cradle
- Chapter 3
- Software Installation
- Chapter 4
- Multi-User Setup
- Chapter 5
- Technical Description
- System Labeling
- Essential Performance
- Warnings
- Cautions
- System Specifications
- PillCam SB Capsule
- PillCam SB 2 Capsule
- PillCam ESO 2 Capsule
- PillCam ESO 3 Capsule
- PillCam COLON 2 Capsule
- SensorArray DataRecorder 2
- SensorArray DataRecorder 3
- SB SensorBelt for DataRecorder 2 and DataRecorder 3
- DataRecorder 2 /2C
- Cradle DataRecorder 2
- DataRecorder 3
- Cradle DataRecorder 3
- DC Power Supply
- DataRecorder 3 Memory Card
- RAPID Software
- Guidance and Manufacturer's Declarations
- Chapter 6
- Maintenance
- Chapter 7
- Troubleshooting

PillCam Platform
66 Chapter 6
• in the bottom left corner of the DataRecorder Info screen
• in the DataRecorder 2 bar in the
DataRecorders screen
• the orange LED on the cradle blinks
7. To return to other RAPID functions, click Close.
8. If you need to stop the discharge (also for automatic discharge) while it is in progress, return
to the
DataRecorder Info screen and click Stop Discharge.
If you stop the automatic discharge process in the middle, the battery LEDs may not indicate
the correct battery status.
Note
Do not charge the battery in the vicinity of the patient.
For more information on charging the DataRecorder 2, see Charging DataRecorder on page 63.
Make sure the DataRecorder is fully charged for SB and Colon Capsule Endoscopy, and that at
least two of the four battery LEDs light up for an ESO Capsule Endoscopy.
DataRecorder 3
The following table lists and explains the LEDs of the DataRecorder 3 Cradle and their meaning:
To Charge the DataRecorder
1. First plug the power cable into the cradle and plug the power cable into the wall outlet.
2. Insert the DataRecorder into the cradle. The bottom LED is orange when charging the battery.
3. As soon as the DataRecorder is fully charged, the bottom LED turns green. Leave the
DataRecorder in its cradle until the next examination.
LED Status Explanation
Green On Battery Pack is ready for use
Yellow
On Battery Pack is charging
Blinking Battery Pack is charging