
User Manual
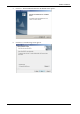
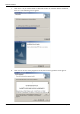
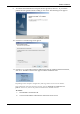
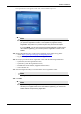
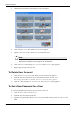
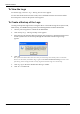
Table Of Contents
- Book 1: Setup & Maintenance
- Table of Contents
- Chapter 1
- Introduction
- Chapter 2
- Setting Up the System
- Setup Requirements
- Given Workstation
- DataRecorder and Cradle
- Storage Space for the PillCam Capsule Box
- Main Platform Components
- Connecting the Components
- Connecting the Given Workstation
- 1. Connect the Mouse cable to the Mouse connector.
- 2. Connect the Keyboard cable to the Keyboard connector.
- 3. Connect the monitor to the Workstation.
- 4. Connect the printer to the LPT connector or to the USB connector, depending on the printer’s connection cable.
- 5. If the Workstation’s voltage setting is manual, verify that the Workstation’s voltage matches the local voltage. If it does not, call Given Customer Support.
- 6. After voltage verification, connect the power cable of the Given Workstation to the electric outlet.
- 7. Connect the power cable of the monitor to the wall electric outlet.
- Connecting the DataRecorder Cradle
- Chapter 3
- Software Installation
- Chapter 4
- Multi-User Setup
- Chapter 5
- Technical Description
- System Labeling
- Essential Performance
- Warnings
- Cautions
- System Specifications
- PillCam SB Capsule
- PillCam SB 2 Capsule
- PillCam ESO 2 Capsule
- PillCam ESO 3 Capsule
- PillCam COLON 2 Capsule
- SensorArray DataRecorder 2
- SensorArray DataRecorder 3
- SB SensorBelt for DataRecorder 2 and DataRecorder 3
- DataRecorder 2 /2C
- Cradle DataRecorder 2
- DataRecorder 3
- Cradle DataRecorder 3
- DC Power Supply
- DataRecorder 3 Memory Card
- RAPID Software
- Guidance and Manufacturer's Declarations
- Chapter 6
- Maintenance
- Chapter 7
- Troubleshooting

RAPID Installation
Chapter 3 29
The registration screen appears at the end of the installation process:
Note
Keep the registration window open until you finish the registration. Each time
you open the registration window, a new System Key appears and any
Registration Key based on a previous System Key will not be accepted.
If you click Exit, you can open and use the RAPID software, but after seven
uses without registering, you must first perform registration in order to use
RAPID.
15. Obtain a Registration Key via the Given registration center online or by phone:
• online: https://portal.givenimaging.com/RapidRegistration
• by phone: call your local Given customer support center
16. Be ready to provide the Given registration center with the following information:
• System ID (from the registration screen)
• System Key (from the registration screen)
• RAPID DVD serial number (supplied with the DVD)
• Your customer ID
17. Enter the Registration Key received from the Given registration center.
Note
The registration process uses ONLY lower case letters and numbers.
18. Click OK.
Note
If you do not register during installation, the next six times you open RAPID, it
will ask you to register. After seven uses without registering, you cannot use
RAPID without first performing registration.