
User Manual
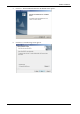
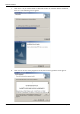
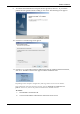
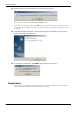
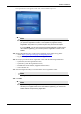
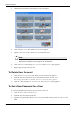
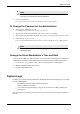
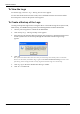
Table Of Contents
- Book 1: Setup & Maintenance
- Table of Contents
- Chapter 1
- Introduction
- Chapter 2
- Setting Up the System
- Setup Requirements
- Given Workstation
- DataRecorder and Cradle
- Storage Space for the PillCam Capsule Box
- Main Platform Components
- Connecting the Components
- Connecting the Given Workstation
- 1. Connect the Mouse cable to the Mouse connector.
- 2. Connect the Keyboard cable to the Keyboard connector.
- 3. Connect the monitor to the Workstation.
- 4. Connect the printer to the LPT connector or to the USB connector, depending on the printer’s connection cable.
- 5. If the Workstation’s voltage setting is manual, verify that the Workstation’s voltage matches the local voltage. If it does not, call Given Customer Support.
- 6. After voltage verification, connect the power cable of the Given Workstation to the electric outlet.
- 7. Connect the power cable of the monitor to the wall electric outlet.
- Connecting the DataRecorder Cradle
- Chapter 3
- Software Installation
- Chapter 4
- Multi-User Setup
- Chapter 5
- Technical Description
- System Labeling
- Essential Performance
- Warnings
- Cautions
- System Specifications
- PillCam SB Capsule
- PillCam SB 2 Capsule
- PillCam ESO 2 Capsule
- PillCam ESO 3 Capsule
- PillCam COLON 2 Capsule
- SensorArray DataRecorder 2
- SensorArray DataRecorder 3
- SB SensorBelt for DataRecorder 2 and DataRecorder 3
- DataRecorder 2 /2C
- Cradle DataRecorder 2
- DataRecorder 3
- Cradle DataRecorder 3
- DC Power Supply
- DataRecorder 3 Memory Card
- RAPID Software
- Guidance and Manufacturer's Declarations
- Chapter 6
- Maintenance
- Chapter 7
- Troubleshooting

RAPID Installation
Chapter 3 27
9. To continue the installation and accept the license agreement, click Yes. If you wish to
print the license agreement before reading it, click
Print. The following screen appears.
10. Click Next. The following screen appears.
11. Click Browse if you wish to install in a different location. To continue with the installation,
click
Next. The Please Wait screen appears and the installation starts.
Depending on the computer configuration, this stage takes at least several minutes.
If the installation fails, the following message appears:
RAPID installation has
failed.
In that case, restore the previous version of the RAPID Software.
To restore:
a. Insert RAPID 7 Installation CD.
b. Click Install RAPID and follow the instructions on the screen.