
User Manual


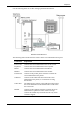

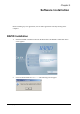
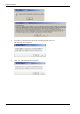
Table Of Contents
- Book 1: Setup & Maintenance
- Table of Contents
- Chapter 1
- Introduction
- Chapter 2
- Setting Up the System
- Setup Requirements
- Given Workstation
- DataRecorder and Cradle
- Storage Space for the PillCam Capsule Box
- Main Platform Components
- Connecting the Components
- Connecting the Given Workstation
- 1. Connect the Mouse cable to the Mouse connector.
- 2. Connect the Keyboard cable to the Keyboard connector.
- 3. Connect the monitor to the Workstation.
- 4. Connect the printer to the LPT connector or to the USB connector, depending on the printer’s connection cable.
- 5. If the Workstation’s voltage setting is manual, verify that the Workstation’s voltage matches the local voltage. If it does not, call Given Customer Support.
- 6. After voltage verification, connect the power cable of the Given Workstation to the electric outlet.
- 7. Connect the power cable of the monitor to the wall electric outlet.
- Connecting the DataRecorder Cradle
- Chapter 3
- Software Installation
- Chapter 4
- Multi-User Setup
- Chapter 5
- Technical Description
- System Labeling
- Essential Performance
- Warnings
- Cautions
- System Specifications
- PillCam SB Capsule
- PillCam SB 2 Capsule
- PillCam ESO 2 Capsule
- PillCam ESO 3 Capsule
- PillCam COLON 2 Capsule
- SensorArray DataRecorder 2
- SensorArray DataRecorder 3
- SB SensorBelt for DataRecorder 2 and DataRecorder 3
- DataRecorder 2 /2C
- Cradle DataRecorder 2
- DataRecorder 3
- Cradle DataRecorder 3
- DC Power Supply
- DataRecorder 3 Memory Card
- RAPID Software
- Guidance and Manufacturer's Declarations
- Chapter 6
- Maintenance
- Chapter 7
- Troubleshooting

Chapter 2
Chapter 2
19
Use the following sketch as an aid in setting up the PillCam Platform:
Dell Given Workstation
The following table lists the items that connect to the Given Workstation back panel:
Connection Explanation
Power cord Connects the Given Workstation to the electric socket.
Keyboard Connects the Given Workstation to the keyboard.
Mouse Connects the Given Workstation to the Mouse
Monitor Connects the Given Workstation to the monitor.
Parallel Port Connects to the parallel printer cable that connects the
Given Workstation to the printer.
USB Port Connects to the USB cable that connects the Given
Workstation to the printer, as an alternative to using
Parallel Port.
USB 2 Port The USB 2.0 ports connect to the USB cables that connect
the Given Workstation to the DataRecorder Cradle and to
the Card reader.
Modem Connects to the telephone cable that connects the Given
Workstation to a phone line. Don't connect at setup.
Connect the modem only if instructed to do so by Given
Customer Support.