
User Manual
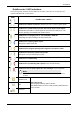
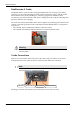
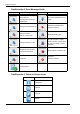
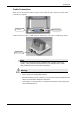
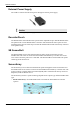
Table Of Contents
- Book 1: Setup & Maintenance
- Table of Contents
- Chapter 1
- Introduction
- Chapter 2
- Setting Up the System
- Setup Requirements
- Given Workstation
- DataRecorder and Cradle
- Storage Space for the PillCam Capsule Box
- Main Platform Components
- Connecting the Components
- Connecting the Given Workstation
- 1. Connect the Mouse cable to the Mouse connector.
- 2. Connect the Keyboard cable to the Keyboard connector.
- 3. Connect the monitor to the Workstation.
- 4. Connect the printer to the LPT connector or to the USB connector, depending on the printer’s connection cable.
- 5. If the Workstation’s voltage setting is manual, verify that the Workstation’s voltage matches the local voltage. If it does not, call Given Customer Support.
- 6. After voltage verification, connect the power cable of the Given Workstation to the electric outlet.
- 7. Connect the power cable of the monitor to the wall electric outlet.
- Connecting the DataRecorder Cradle
- Chapter 3
- Software Installation
- Chapter 4
- Multi-User Setup
- Chapter 5
- Technical Description
- System Labeling
- Essential Performance
- Warnings
- Cautions
- System Specifications
- PillCam SB Capsule
- PillCam SB 2 Capsule
- PillCam ESO 2 Capsule
- PillCam ESO 3 Capsule
- PillCam COLON 2 Capsule
- SensorArray DataRecorder 2
- SensorArray DataRecorder 3
- SB SensorBelt for DataRecorder 2 and DataRecorder 3
- DataRecorder 2 /2C
- Cradle DataRecorder 2
- DataRecorder 3
- Cradle DataRecorder 3
- DC Power Supply
- DataRecorder 3 Memory Card
- RAPID Software
- Guidance and Manufacturer's Declarations
- Chapter 6
- Maintenance
- Chapter 7
- Troubleshooting

Introduction
Chapter 1 9
DataRecorder 3 LED Indications
The following table describes the LED indicators and their status/color for each of the most
common DataRecorder 3 events/status.
LEDs DataRecorder 3 Status
DataRecorder is initialized with patient data and ready to capture capsule signals.
DataRecorder shuts down if no capsule signals are received for more than 90 minutes.
Blinking
DataRecorder is receiving capsule signals before capsule pairing is achieved.
Blinking rate = capsule frame rate
Blinking
DataRecorder is receiving paired capsule signals.
Blinking rate = capsule frame rate.
Blink every 5 seconds
DataRecorder has stopped receiving capsule signals for more than 5 seconds.
DataRecorder has started downloading.
DataRecorder has stopped recording because the memory card is full.
Blinking
There is an instruction on the DataRecorder screen.
DataRecorder is malfunctioning.
Blinking
DataRecorder detects capsule signal, but is not recording it.
This is a malfunction. Check the SensorArray connection or have patient move to a
different location.
The LEDS on the navigation buttons blink in blue once every 5 seconds when the
DataRecorder is on, out of the cradle and the LCD screen is off.
Pressing any of the navigation buttons when the LCD screen is OFF will turn the LCD
screen ON.