
User Manual
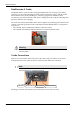
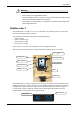
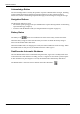
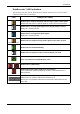
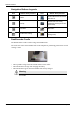
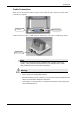
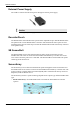
Table Of Contents
- Book 1: Setup & Maintenance
- Table of Contents
- Chapter 1
- Introduction
- Chapter 2
- Setting Up the System
- Setup Requirements
- Given Workstation
- DataRecorder and Cradle
- Storage Space for the PillCam Capsule Box
- Main Platform Components
- Connecting the Components
- Connecting the Given Workstation
- 1. Connect the Mouse cable to the Mouse connector.
- 2. Connect the Keyboard cable to the Keyboard connector.
- 3. Connect the monitor to the Workstation.
- 4. Connect the printer to the LPT connector or to the USB connector, depending on the printer’s connection cable.
- 5. If the Workstation’s voltage setting is manual, verify that the Workstation’s voltage matches the local voltage. If it does not, call Given Customer Support.
- 6. After voltage verification, connect the power cable of the Given Workstation to the electric outlet.
- 7. Connect the power cable of the monitor to the wall electric outlet.
- Connecting the DataRecorder Cradle
- Chapter 3
- Software Installation
- Chapter 4
- Multi-User Setup
- Chapter 5
- Technical Description
- System Labeling
- Essential Performance
- Warnings
- Cautions
- System Specifications
- PillCam SB Capsule
- PillCam SB 2 Capsule
- PillCam ESO 2 Capsule
- PillCam ESO 3 Capsule
- PillCam COLON 2 Capsule
- SensorArray DataRecorder 2
- SensorArray DataRecorder 3
- SB SensorBelt for DataRecorder 2 and DataRecorder 3
- DataRecorder 2 /2C
- Cradle DataRecorder 2
- DataRecorder 3
- Cradle DataRecorder 3
- DC Power Supply
- DataRecorder 3 Memory Card
- RAPID Software
- Guidance and Manufacturer's Declarations
- Chapter 6
- Maintenance
- Chapter 7
- Troubleshooting

PillCam Platform
8 Chapter 1
Acknowledge Button
The Acknowledge button is used by the patient in response to DataRecorder messages, including
regimen instruction messages during post ingestion regimen (see Post Capsule Ingestion
Instructions in Book 2: Performing Capsule Endoscopy) to acknowledge receiving the message.
Navigation Buttons
The Navigation buttons are used:
• For manual capsule paring process (see DataRecorder-Capsule Pairing in Book 2: Performing
Capsule Endoscopy, Chapter 4)
• To interact with the DataRecorder (see Navigation Buttons Legends on page 12)
Battery Status
The battery icon on the screen indicates the status of the battery in 10% increments.
When the battery charge is below 10% the battery icon turns red. When the battery charge is
below 5% the DataRecorder shuts down.
When the DataRecorder 3 is charging in its cradle, the bottom LED in the cradle is orange. When
the DataRecorder is ready for use, the bottom LED in the cradle is green.
DataRecorder Automatic Shutdown
After the DataRecorder has been initialized with patient data, it goes into a standby mode when
removed from its cradle and starts recording as soon as a signal is received from a paired capsule.
If after 90 minutes no paired signal is received, the DataRecorder automatically shuts down.
The DataRecorder 3 also turns off five minutes after End of Procedure .