
User Manual
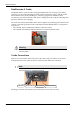
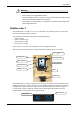
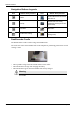
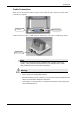
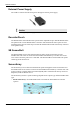
Table Of Contents
- Book 1: Setup & Maintenance
- Table of Contents
- Chapter 1
- Introduction
- Chapter 2
- Setting Up the System
- Setup Requirements
- Given Workstation
- DataRecorder and Cradle
- Storage Space for the PillCam Capsule Box
- Main Platform Components
- Connecting the Components
- Connecting the Given Workstation
- 1. Connect the Mouse cable to the Mouse connector.
- 2. Connect the Keyboard cable to the Keyboard connector.
- 3. Connect the monitor to the Workstation.
- 4. Connect the printer to the LPT connector or to the USB connector, depending on the printer’s connection cable.
- 5. If the Workstation’s voltage setting is manual, verify that the Workstation’s voltage matches the local voltage. If it does not, call Given Customer Support.
- 6. After voltage verification, connect the power cable of the Given Workstation to the electric outlet.
- 7. Connect the power cable of the monitor to the wall electric outlet.
- Connecting the DataRecorder Cradle
- Chapter 3
- Software Installation
- Chapter 4
- Multi-User Setup
- Chapter 5
- Technical Description
- System Labeling
- Essential Performance
- Warnings
- Cautions
- System Specifications
- PillCam SB Capsule
- PillCam SB 2 Capsule
- PillCam ESO 2 Capsule
- PillCam ESO 3 Capsule
- PillCam COLON 2 Capsule
- SensorArray DataRecorder 2
- SensorArray DataRecorder 3
- SB SensorBelt for DataRecorder 2 and DataRecorder 3
- DataRecorder 2 /2C
- Cradle DataRecorder 2
- DataRecorder 3
- Cradle DataRecorder 3
- DC Power Supply
- DataRecorder 3 Memory Card
- RAPID Software
- Guidance and Manufacturer's Declarations
- Chapter 6
- Maintenance
- Chapter 7
- Troubleshooting

Introduction
Chapter 1 7
Warning
• The cradle is for indoor use only.
• Never charge non-rechargeable batteries.
• All cells containing mercury, cadmium, or lead as electrochemical substances are
subject to special waste disposal requirements.
• This charger is a class A product. In a domestic environment, this charger may
cause radio interference.
DataRecorder 3
The DataRecorder 3 consists of a receiver, a transmitter, and a memory device for storing the
data transmitted by the PillCam capsule.
The standard DataRecorder 3 Kit includes the following items:
• DataRecorder 3
• Pouch + shoulder strap
• DataRecorder 3 cradle
• External power supply
SensorArrays are not part of the standard kit, and are supplied separately.
The battery of the DataRecorder 3 is charged while the DataRecorder is in its cradle.
The DataRecorder is ready for operation when its battery is charged, removed from the cradle,
and the SensorArray is connected. When ON, the DataRecorder initiates pairing procedure (see
DataRecorder-Capsule Pairing in chapter 4 of the Procedure Manual) as soon as a signal is
received from a capsule. When the capsule LED on the DataRecorder blinks in blue, the
DataRecorder is receiving data from a paired capsule.
ON/OFF Button
Acknowledge Button
Capsule and Message
LEDs
Line for status icons
Procedure info area
Navigation Buttons
Cradle
Card Reader
Message area
Capsule LED
Message LED