PillCam® Platform Setup & Maintenance RAPID® 7 DOC-1530-01 August 2010 Book 1 Book 1: Setup & Maintenance Book 2: Performing Capsule Endoscopy Book 3: Using the RAPID® Software
COPYRIGHT This manual is the property of Given Imaging Limited and may not be transferred or reproduced in any form without the written permission of Given Imaging Limited. Copyright © 2001-2010 Given Imaging Ltd.
Table of Contents Chapter 1 Introduction ........... ............................................................................................................ 1 Conventions ............................................................................................................................. 1 Welcome to the PillCam Platform........................................................................................... PillCam Video Capsule ..............................................................
PillCam Platform Multi-User Setup ..............................................................................................................31 System Administration ......................................................................................................... To Define a User .............................................................................................................. To Delete User Account .....................................................................................
Table of Contents DataRecorder 3................................................................................................................. 66 SensorBelt Cleaning.............................................................................................................. 67 SensorArray Cleaning ........................................................................................................... 67 Chapter 7 Troubleshooting ......... ............................................................
PillCam Platform iv
Chapter 1 Introduction Conventions Screen elements, such as text on the screen in messages, or in menus, as well as button names are in bold and italics: e.g. Capture button. Screen names, are in a bold type face: e.g. DataRecorders screen. The footer shows the page number company name or the chapter number. The header shows the equipment name and chapter name.
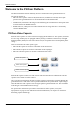
PillCam Platform Welcome to the PillCam Platform The PillCam Platform enables minimally invasive visualization of the gastrointestinal tract.
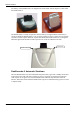
Introduction Handling the PillCam Video Capsule Each PillCam video capsule comes in its own box that enables the handling of the capsule until ingestion. A magnet close to the capsule in the box keeps it inactive until removal from the box. The capsule is active immediately after removal from the box. To ensure the capsule remains inactive, it must be in the box. PillCam video capsules are packed at Given Imaging Ltd.
PillCam Platform The battery of the DataRecorder 2 is charged in the cradle either with its adaptor or while inside the DataRecorder 2. The DataRecorder 2 is ready for operation when its battery is charged and the SensorArray is connected. When the DataRecorder 2 is on, it starts recording as soon as a signal is received from any PillCam video capsule. When the capsule LED blinks, the DataRecorder 2 is receiving data. When the signal from the PillCam video capsule is too weak, the LED does not blink.
Introduction DataRecorder 2 LED Indications The following table describes the LED indicators and their status/color for each of the most common DataRecorder 2 events/status. LEDs DataRecorder 2 Status DataRecorder is ON but not initialized. DataRecorder does not capture capsule signals. DataRecorder is initialized with patient data and ready to capture capsule signals.
PillCam Platform DataRecorder 2 Cradle The DataRecorder 2 Cradle is used to charge the DataRecorder 2 or to charge a spare battery externally. It is also used to discharge the battery before starting the recharge, when the Cradle detects that the battery needs refreshing (i.e., the battery gauge needs calibration). Thus occasionally, when inserted into the cradle, before charging starts, the Cradle may discharge first the battery and then start recharging.
Introduction Warning • The cradle is for indoor use only. • Never charge non-rechargeable batteries. • All cells containing mercury, cadmium, or lead as electrochemical substances are subject to special waste disposal requirements. • This charger is a class A product. In a domestic environment, this charger may cause radio interference. DataRecorder 3 The DataRecorder 3 consists of a receiver, a transmitter, and a memory device for storing the data transmitted by the PillCam capsule.
PillCam Platform Acknowledge Button The Acknowledge button is used by the patient in response to DataRecorder messages, including regimen instruction messages during post ingestion regimen (see Post Capsule Ingestion Instructions in Book 2: Performing Capsule Endoscopy) to acknowledge receiving the message.
Introduction DataRecorder 3 LED Indications The following table describes the LED indicators and their status/color for each of the most common DataRecorder 3 events/status. LEDs DataRecorder 3 Status DataRecorder is initialized with patient data and ready to capture capsule signals. DataRecorder shuts down if no capsule signals are received for more than 90 minutes. Blinking Blinking DataRecorder is receiving capsule signals before capsule pairing is achieved.
PillCam Platform DataRecorder 3 Error Message Guide Popup Message Popup Message No valid approved memory card is detected. Verify approved card is in the DataRecorder. Do not move DataRecorder from cradle Memory card is write-protected SensorArray hardware failure. Consult a technician. Memory card error. Remove + reinsert card. Wrong SensorArray type Insufficient memory on card No USB connection to cradle. Check connection.
Introduction DataRecorder 3 Screen Icons The following icons appear in the top status line of the DataRecorder screen.
PillCam Platform Navigation Buttons Legends Icon Action when pressed Icon Action when pressed Confirm Confirm SB detection and activate instruction #1 Scroll up Activate Real-Time viewing (followed by pressing the left and right buttons) Scroll down Mark frame Exit Real-Time viewing Switch video head (in Real-Time viewing mode) DataRecorder Cradle The DataRecorder Cradle is used to charge the DataRecorder.
Introduction Cradle Connections There are two connections on the back panel of the cradle: the power connector and the USB connection to computer. USB Connection to computer Power connector At the front of the cradle is a USB socket for connecting a card reader or USB storage device. USB connector Note Connect only USB storage devices, DataRecorder 3 memory cards (in its reader), or self-powered external hard drives to the DataRecorder 3 cradle. Other USB devices may not function as indicated.
PillCam Platform External Power Supply The Cradle is connected to the mains power through an external power supply. ! Caution Use only this power supply. RecorderPouch The DataRecorder 3 RecorderPouch is a pouch with an adjustable strap to hold the DataRecorder. The patient must wear the DataRecorder at all times while the PillCam video capsule is active inside the patient. Use the waist strap to anchor the DataRecorder and the SensorArray connector to the patient’s body.
Introduction • 8-lead SensorArray DR3: used with DataRecorder 3 and PillCam SB 2 and PillCam COLON 2 capsules. This SensorArray also transmits control signals to the COLON 2 capsule through the transmitter loop antenna. • 3-lead SensorArray: used with DataRecorder 2 and PillCam ESO 2 capsules • 3-lead SensorArray DR3: used with DataRecorder 3 and PillCam ESO 3 capsules Note All components of the PillCam Platform are Latex free.
PillCam Platform RAPID 7 Software RAPID 7 supports PillCam capsule endoscopy of the GI tract with all PillCam video capsules. RAPID 7 supports patient check-in/DataRecorder initialization, video creation, viewing of the RAPID video, and generation of a Capsule Endoscopy Report.
Chapter 2 Setting Up the System Setup Requirements Set up your office to accomodate the new PillCam Platform. Review the following Workstation specifications: Four electrical outlets are required to connect the following components: Workstation computer, monitor, printer, and one cradle. Each additional cradle requires an additional outlet. Note You may use a Given approved power strip.
PillCam Platform Given Workstation The footprint of the Given Workstation is about 18 cm (W) x 47 cm (D) x 45 cm (H). DataRecorder and Cradle The cradle of any DataRecorder with its cable connections have a footprint of about 8-12 inches (20-30 cm). The DataRecorder is kept in its cradle when not in use. Storage Space for the PillCam Capsule Box Provide a storage space that is protected from any powerful electromagnetic source, for storing the PillCam video capsule 1box.
Chapter 2 Use the following sketch as an aid in setting up the PillCam Platform: Dell Given Workstation The following table lists the items that connect to the Given Workstation back panel: Chapter 2 Connection Explanation Power cord Connects the Given Workstation to the electric socket. Keyboard Connects the Given Workstation to the keyboard. Mouse Connects the Given Workstation to the Mouse Monitor Connects the Given Workstation to the monitor.
PillCam Platform Note You will need the telephone connection only for some maintenance operation on your WorkStation. Connect the modem of the Given Workstation only when instructed to do so by Given Customer Support. To connect, insert the Modem cable into the Modem connector and the other jack phone connector of the Modem cable into the phone outlet. Connecting the Given Workstation 1. Connect the Mouse cable to the Mouse connector. 2. Connect the Keyboard cable to the Keyboard connector. 3.
Chapter 2 Connecting the DataRecorder Cradle You can connect the cradle only to the USB2 ports that are side by side in a separate slot on the back panel of the Workstation. If you are not using a Given Workstation, use a USB hub for connecting more than one cradle to your computer. Note If you use more than one cradle, make sure each one is connected to a different power outlet.
PillCam Platform 22 Chapter 2
Chapter 3 Software Installation Before installing any new application, close all other applications currently running on the computer. RAPID Installation 1. Insert the RAPID 7 Installation disc into the DVD drive. The RAPID 7 installation menu screen appears. 2. Click Install RAPID Access v. 7. The following screens appear. Given Imaging Ltd.
PillCam Platform 24 3. If you have a valid licensed copy of the Operating System, click Yes. The following screen appears. 4. Click Yes. The following screen appears.
RAPID Installation Chapter 3 5. Click Yes. The InstallShield Wizard for the RAPID Atlas appears. 6. Click Next. The following screen appears.
PillCam Platform 26 7. Click Browse if you wish to install in a different location. To continue with the installation, click Next. The following screen appears. 8. Click Finish. As soon as the progress bar is full, the License Agreement screen appears.
RAPID Installation 9. To continue the installation and accept the license agreement, click Yes. If you wish to print the license agreement before reading it, click Print. The following screen appears. 10. Click Next. The following screen appears. 11. Click Browse if you wish to install in a different location. To continue with the installation, click Next. The Please Wait screen appears and the installation starts. Depending on the computer configuration, this stage takes at least several minutes.
PillCam Platform 12. Just before the end of the installation, the following screen appears. This refers to an exported System Wide Settings xml file. If you wish to import such a file, click Yes and browse for the file location. A message warns you that the imported file will overwrite an existing settings file and asks whether you wish to continue. 13. Click Yes. If RAPID installation continues uninterrupted, the following screen appears as soon as all the stages are completed. 14.
RAPID Installation The registration screen appears at the end of the installation process: Note Keep the registration window open until you finish the registration. Each time you open the registration window, a new System Key appears and any Registration Key based on a previous System Key will not be accepted. If you click Exit, you can open and use the RAPID software, but after seven uses without registering, you must first perform registration in order to use RAPID. 15.
PillCam Platform Wide Screen Compatibility In order to get optimal image and reduce risk of getting blurred or distorted images and fonts, the user should set his display resolution according to his screen manufactures' recommendations with these restriction in mind: • RAPID's minimal supported horizontal resolution is 1024. • RAPID's minimal supported vertical resolution is 768.
Chapter 4 Multi-User Setup System Administration Different users in the RAPID may be defined. The settings values set by each user are saved so that each time that user logs in to the system, the relevant settings are in effect. Thus, different users may set different use profiles for themselves. Each user needs to log in with his or her username and password. The default password of the user rapid is blank (no need for password), the default password of the user rapidadmin is rapidadmin (case sensitive).
PillCam Platform 3. Wait for the Given Workstation Manager screen to appear. 4. Click Add New User. The Add New User screen appears. 5. Type in a new User name and Password for the new user. Note The password you type in at this stage is a temporary password. The user is requested to change it when he logs on for the first time. 6. Click Add User. The message User xxx was added successfully appears. 7. Repeat steps 4–6 for each new user. To Delete User Account 1. Click Delete User Account.
Multi-User Setup Note This new password will again be a temporary one, to be changed when the user logs on for the first time with this password. 4. Click Set Password. The message xxx’s Password was changed successfully appears. To Change the Password of the Administrator 1. Click Change Admin Password. The Change Rapidadmin Password screen appears. 2. Type in your current password in the Old (Current) Password field. 3. Type in your new password in the fields New Password and Confirm new Password.
PillCam Platform To View the Logs To view the logs, click View Logs. The Log Viewer screen appears. To view more details about one of the events, select and double click the relevant line and the of that specific action appears. Event Properties screen To Create a Backup of the Logs Creating a backup of the logs involves saving the data to a removable storage device (such as CD, Disk-On-Key, or USB Mass Storage Device) and deleting this data from the Workstation. 34 1.
Chapter 5 Technical Description System Labeling The following table lists the labels attached to various components of the PillCam Platform: Labeling Explanation The PillCam video capsule should not be stored and used near any powerful magnetic fields such as the one created by an MRI. The PillCam video capsule is intended for single use only. ! Given Imaging Ltd. Attention! Consult the documentation provided with the PillCam Platform.
PillCam Platform Capsule Labeling Each box has a label at the bottom as shown below. Each capsule is marked with the expiration date, lot number, and a unique Capsule ID code. Capsule ID Code Expiration Date Lot Number Essential Performance PillCam Video Capsules ON-Mode Data transmitting to DataRecorder is considered to be essential performance of the PillCam capsules. The PillCam capsules shall transmit data continuously monitored by on-line image display as received by DataRecorder.
Technical Description • PillCam video capsules and DataRecorder should not be used adjacent to or stacked with other equipment and that if adjacent or stacked use is necessary, the equipment or system should be observed to verify normal operation in the configuration in which it will be used. • PillCam video capsules and DataRecorder may be interfered with by other equipment, even if that other equipment complies with CISPR emission requirements. • Do not disassemble or modify the battery pack.
PillCam Platform • If the battery pack leaks or gives off a bad odor, remove it from any exposed flame. Otherwise, the leaking electrolyte may catch fire and the battery pack may emit smoke, burst or ignite. • If the battery pack gives off an odor, generates heat, becomes discolored or deformed, or in any way appears abnormal during use, recharging or storage, immediately remove it from the equipment or cradle and stop using it.
Technical Description PillCam SB Capsule Properties Physical Optical Operational Chapter 5 Dimensions Length: 26 mm Diameter: 11 mm Weight 3.30 gr Material Biocompatible plastic Illumination 6 white light emitting diodes # of imaging heads 1 Field of view 140° ISO-8600-3 Effective visibility Distance: 3 cm Magnification 1:8 Min. detectable object Less than 0.
PillCam Platform PillCam SB 2 Capsule Properties Physical Optical Operational 40 Dimensions Length: 26 mm Diameter: 11 mm Weight 2.89gr. Material Biocompatible plastic Illumination 4 white light emitting diodes # of imaging heads 1 Field of view 156° ISO-8600-3 Effective visibility Distance: 3 cm Min. detectable object Less than 0.
Technical Description PillCam ESO 2 Capsule Properties Physical Optical Operational Chapter 5 Dimensions Length: 26 mm Diameter: 11 mm Weight 2.89 gr Material Biocompatible plastic Illumination 4 white light emitting diodes for each head # of imaging heads 2 Field of view 169° ISO-8600-3 for each head Effective visibility Distance: 3 cm Min. detectable object Less than 0.
PillCam Platform PillCam ESO 3 Capsule Properties Physical Optical Operational 42 Dimensions Length: 31.5 mm Diameter: 11.6 mm Weight 2.9 gr Material Biocompatible plastic Illumination 4 white light emitting diodes for each head # of optical heads 2 Field of view 172° ISO-8600-3 for each head Effective visibility Distance: 0–30 mm Min. detectable object 0.
Technical Description PillCam COLON 2 Capsule Properties Physical Optical Operational Uplink communication Downlink communication Chapter 5 Dimensions Length: 31.5 mm Diameter: 11.6 mm Weight 2.9 g Material Biocompatible plastic # of optical heads 2 Illumination 4 white light emitting diodes on each side Field of view 172° ISO-8600-3 Effective visibility Min. detectable object Operating time Distance: 0–30 mm 0.
PillCam Platform SensorArray DataRecorder 2 Versions: SB, COLON, ESO Sensor size Diameter 40 mm Color black Material SB = COLON SensorArray plastic ESO SensorArray 3 sensor elements 8 sensor elements SensorArray DataRecorder 3 Properties Reception antenna Transmission antenna 44 # of sensor elements 3 or 8 sensors Sensor size Diameter: 40 mm Color Black Material Polyurethane, Teflon Antennas wire material Coax wire Antenna structure Loop antenna Size 1.
Technical Description SB SensorBelt for DataRecorder 2 and DataRecorder 3 SensorBelt Insert Dimensions 365 mm x 90 mm Insert material Polypropylene Number of sensors 4 Sensor dimensions Diameter 40 mm Cable length 550 mm Cleaning method Wipe with medical alcohol wipes Expected life 500 procedures SensorBelt Cover and Straps Cover dimensions 385 mm x 125 mm Cover and strap material 100% polyester Fits abdomen size 60 - 130 cm Washing instructions Machine wash, warm, Use mild detergent H
PillCam Platform Cradle DataRecorder 2 Properties Weight 890 g Size (without battery inserter Color Mains power connections black power mains range 100 to 240V 14[D] x 165[W] x 97[H]mm 1x male power cable plug DataRecorder 3 Properties Physical Software Proprietary firmware Recording capacity Up to 15 hours @ LCD OFF Weight 500 g., including battery pack. Operational Power 3.5–4.2 VDC, 0.15–0.5 A Battery type Internal, Li-Ion, 3.8 V typical, 8800 mAH Operating temp.
Technical Description Cradle DataRecorder 3 Properties Weight 250 g Operating temp 0–45°C Color Mains power connections White & Black power mains range Input Voltage: Maximum 5.25V, Min 4.75V Input Current: Maximum 4A, Min 100 mA 1x male power cable plug DC Power Supply Properties Weight 300 g Input connector 3 pole AC inlet IEC320-C14C Input Voltage 90 - 246 VAC Output voltage 5V DC, 5 Amp Protections Short circuit/ Over load/ Over voltage/ Over temp.
PillCam Platform RAPID Software Software RAPID proprietary, version 7 Languages English/French/German/Italian/Spanish/Portuguese/Dutch/ Swedish/Finnish/Danish/Chinese-Mandarin/Korean/Russian/ Greek Data export JPEG Images, (AVI) Video clips, grml (Given proprietary) files, HTML Reports, generic XML-format Capsule Endoscopy report data. Displayed data Single and multi images, Timebar, Colorbar with region specific color and other diagnostic data.
Technical Description Guidance and manufacturer’s declaration - electronic emissions The PillCam capsules are intended for use in the electromagnetic environment specified below. The customer or the user of the PillCam capsules should assure that it is used in such an environment.
PillCam Platform Guidance and manufacturer’s declaration - electronic emissions The PillCam capsules are intended for use in the electromagnetic environment specified below. The customer or the user of the PillCam capsules should assure that it is used in such an environment.
Technical Description Recommended separation distances between portable and mobile RF communications equipment and the PillCam capsules The PillCam capsules are intended for use in an electromagnetic environment in which radiated RF disturbances are controlled.
PillCam Platform Guidance and manufacturer’s declaration - electromagnetic immunity for all equipment and systems The PillCam COLON 2 capsules are intended for use in the electromagnetic environment specified below. The customer or the user of the PillCam COLON 2 capsules should assure that it is used in such an environment.
Technical Description Guidance and manufacturer’s declaration - electromagnetic immunity The PillCam COLON 2 capsules are intended for use in the electromagnetic environment specified below. The customer or the user of the PillCam capsules should assure that it is used in such an environment.
PillCam Platform Recommended separation distances between portable and mobile RF communications equipment and the PillCam COLON 2 capsules The PillCam COLON 2 capsules are intended for use in an electromagnetic environment in which radiated RF disturbances are controlled.
Technical Description DataRecorder 2(C) Guidance and manufacturer’s declaration - electronic emissions The DataRecorder 2 is intended for use in the electromagnetic environment specified below. The customer or the user of the DataRecorder 2 should assure that it is used in such an environment.
PillCam Platform Guidance and manufacturer’s declaration - electronic emissions Voltage dips, short interruptions and voltage variations on power supply input lines IEC 61000-4-11 <5 % UT (>95 % dip in UT) for 0.5 cycle <5 % UT (>95 % dip in UT) for 0.
Technical Description Guidance and manufacturer’s declaration - electronic emissions NOTE 1: At 80 MHz and 800 MHz, the higher frequency range applies. NOTE 2: These guidelines may not apply in all situations. Electromagnetic propagation is affected by absorption and reflection from structures, objects and people. NOTE 3: P is the maximum output power rating of the transmitter in watts (W) according to the transmitter manufacturer and d is the recommended separation distance in meters (m).
PillCam Platform DataRecorder 3 Guidance and manufacturer’s declaration - electromagnetic emissions The DataRecorder 3 is intended for use in the electromagnetic environment specified below. The customer or the user of the DataRecorder 3 should assure that it is used in such an environment.
Technical Description Guidance and manufacturer’s declaration - electromagnetic immunity for all equipment and systems Voltage dips, short interruptions and voltage variations on power supply input lines IEC 61000-4-11 <5 % UT (>95 % dip in UT) for 0.5 cycle 40 % UT (60 % dip in UT) for 5 cycles 70 % UT (30 % dip in UT) for 25 cycles N/A Mains power quality should be that of a typical commercial or hospital environment.
PillCam Platform Guidance and manufacturer’s declaration - electromagnetic immunity The DataRecorder 3 is intended for use in the electromagnetic environment specified below. The customer or the user of the DataRecorder 3 should assure that it is used in such an environment.
Technical Description Recommended separation distances between portable and mobile RF communications equipment and the DataRecorder 3 The DataRecorder 3 is intended for use in an electromagnetic environment in which radiated RF disturbances are controlled.
PillCam Platform 62 Chapter 5
Chapter 6 Maintenance Charging DataRecorder Disclaimer The DataRecorder cradle is a non-medical device, used for charging the DataRecorder from Given Imaging Ltd. Important Safety Instructions Note Before using the DataRecorder Cradle, read all instructions on cautionary markings on the Cradle, on the Battery and on the DataRecorder. ! Caution Use only the provided power cable for the DataRecorder Cradle. Charge the DataRecorder in its dedicated Cradle only.
PillCam Platform installation. If this equipment does cause harmful interference to radio or television reception, which can be determined by turning the equipment off and on, the user is encouraged to try to correct the interference by one or more of the following measures: • Reorient or relocate the receiving antenna. • Increase the separation between the equipment and receiver. • Connect the equipment into an outlet on a circuit different from that to which the receiver is connected.
Maintenance We recommend manually discharging the DataRecorder 2 battery once every three months, even if the DataRecorder 2 is not used. This will prevent the DataRecorder 2 from discharging automatically at an inconvenient time, since the discharge is an overnight process that may take up to 12 hours. 3. As soon as the DataRecorder 2 or its Battery Pack are fully charged, the green LED turns on, and the Orange LED turns off. Leave the DataRecorder 2 in its Cradle until the next examination.
PillCam Platform • in the bottom left corner of the DataRecorder Info screen • in the DataRecorder 2 bar in the DataRecorders screen • the orange LED on the cradle blinks 7. To return to other RAPID functions, click Close. 8. If you need to stop the discharge (also for automatic discharge) while it is in progress, return to the DataRecorder Info screen and click Stop Discharge. If you stop the automatic discharge process in the middle, the battery LEDs may not indicate the correct battery status.
Maintenance SensorBelt Cleaning The SensorBelt may be machine washed after removal of the SensorBelt Insert. Follow instructions on the care label and use a mild detergent. The surface of the SensorBelt may be wiped with any commonly used disinfectant. The SensortBelt Insert may be wiped gently with alcohol (up to 70%). SensorArray Cleaning For mild cleaning (dirt, sweat), wipe the sensors gently with alcohol (up to 70%). The alcohol will not remove the adhesive.
PillCam Platform 68 Chapter 6
Chapter 7 Troubleshooting RAPID Video Problem Short Video Gaps Bad image quality Video shorter than capsule operating time without either ingestion phase images or body exit images No Localization Cause • Capsule • DataRecorder Battery • DataRecorder Mishandling • Capsule • Interference • Mishandling • Physiological • Stripes in video • Pixilation/confetti • Dark/red/orange image • Capsule • DataRecorder Battery • Interference Action • Contact Customer Support • Send video on CD/DVD • Inform Capsule Lo
PillCam Platform Printer Problem Cannot print report Cause Printer is turned off Printer is not set as default printer Action Turn printer on Set printer to Default Printer Printer has a malfunction Contact Customer Support Cause CD/DVD is not blank or compatible with CD/DVD ROM Wrong Burning procedure A video on the disc is open Action Contact Customer Support Cause Software or Hardware corruption Atlas installation is incomplete or incorrect Action Contact Customer Support • Reinstall Atlas • Con
Troubleshooting Problem Given Workstation does not recognize USB storage device Cause USB storage device is not compatible Malfunction of the USB connection on Given Workstation USB storage device malfunction Malfunction of the USB connection on Given Workstation Printer malfunction Printer driver is missing Given Workstation does not recognize printer Action Contact Customer Support 1 Change USB port 2 Contact Customer Support Contact Customer Support 1 Change USB port 2 Contact Customer Support Contac
PillCam Platform Low Signal If a low signal is detected during the examination, the following message appears. A low signal detected during the examination may be due to: • Improper use of the SensorArray • A defective SensorArray • A DataRecorder malfunction If this message is displayed, Contact Customer Support. Click OK to close the message.
Index A Acknowledge Button .............................. 8 Automatic Shutdown DataRecorder .............................. 4, 8 B back pannel connectors ......................... 19 Backup Logs. ....................................... 34 Backup, create ...................................... 34 Battery and Capsule Icons ..................... 11 Battery Status ......................................... 8 C Capsule storage space .................................. 18 Troubleshooting .............................
PillCam SB 2 Capsule .......................... 40 PillCam SB Capsule ............................. 39 Printer Troubleshooting ............................. 70 Workstation Manager ........................... 32 R RAPID Troubleshooting ............................. RAPID C2 Installation CD ................... RAPID Video Troubleshooting ............................. RAPID Workstation connecting ..................................... RecorderPouch .................................... registration ...........