
User's Manual

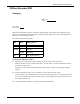
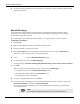

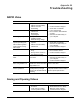
Table Of Contents
- User Manual
- RAPID® v8.3
- Table of Contents
- Chapter 1
- Using This Guide
- Chapter 2
- Indications, Contraindications, Warnings, Cautions
- Chapter 3
- Welcome to PillCam Capsule Endoscopy
- Chapter 4
- Preparing for PillCam Capsule Endoscopy
- Preparing the Patient
- Preparing the Required Equipment
- Creating Patient Instructions for the Procedure
- General Patient Guidelines During the Procedure
- Performing Patient Check-in
- Fitting Equipment on the Patient
- Chapter 5
- Know Your PillCam Recorder
- Chapter 6
- Performing PillCam Capsule Endoscopy
- Chapter 7
- Creating RAPID Videos
- Chapter 8
- Reviewing and Interpreting RAPID Videos
- Loading a Study with the Study Manager
- Using the Study Manager
- Overview of the RAPID Interface
- Using RAPID to View a Video
- RAPID Video Files
- Working with Findings
- Creating a PillCam Capsule Endoscopy Report
- RAPID Atlas
- Lewis Score
- Generating a Report
- Appendix A1
- Installing RAPID Software
- Appendix A2
- Configuring RAPID Software
- Appendix A3
- PillCam Equipment Maintenance
- Appendix A4
- Troubleshooting
- Appendix A5
- Technical Description
- System Labeling
- Essential Performance
- Warnings
- Cautions
- System Specifications
- PillCam SB 2 Capsule
- PillCam SB 3 Capsule
- PillCam UGI Capsule
- PillCam COLON 2 Capsule
- Sensor Array PillCam Recorder DR2
- Sensor Array PillCam Recorder DR3
- PillCam Recorder DR2/DR2C
- Cradle PillCam Recorder DR2
- PillCam Recorder DR3
- PillCam Recorder DR3 SDHC Memory Card
- Cradle PillCam Recorder DR3
- DC Power Supply
- RAPID for PillCam Software
- Guidance and Manufacturer's Declarations
- Index

PillCam Equipment Maintenance
PillCam Recorder Maintenance 203
PillCam Recorder DR2
Charging
Make sure the PillCam recorder is at least 80% charged (eight or more battery bars displayed on the
battery icon) for SB and COLON procedures, and at least 50% charged (five or more bars displayed on
the battery icon) for ESO procedures.
The cradle has the following LEDs:
To charge the PillCam recorder:
1. Plug the power cable into the cradle and plug the power cable into the wall outlet.
All three LEDs turn on for a self-test that takes 5 seconds. After 5 seconds, all LEDs turn off and
the cradle is ready for use.
If during the self-test the red LED blinks, the cradle is faulty. Contact Given Imaging Customer
Support.
2. Insert the PillCam recorder or its Li-Ion battery with its adaptor into the cradle.
All three LEDs of the cradle blink for 4 seconds. When the orange LED is on, charging has started.
As soon as the PillCam recorder or its battery pack are fully charged, the green LED turns on, and
the orange LED turns off.
3. Leave the PillCam recorder in its cradle until the next examination.
LED Status Battery pack is...
Green On ready for use
Orange On charging
Blinking discharging
Red On faulty (malfunctioning)
Adaptor with
battery
Green, orange,
and red LEDs