
User's Manual
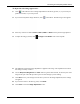

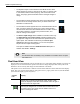
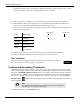
Table Of Contents
- User Manual
- RAPID® v8.3
- Table of Contents
- Chapter 1
- Using This Guide
- Chapter 2
- Indications, Contraindications, Warnings, Cautions
- Chapter 3
- Welcome to PillCam Capsule Endoscopy
- Chapter 4
- Preparing for PillCam Capsule Endoscopy
- Preparing the Patient
- Preparing the Required Equipment
- Creating Patient Instructions for the Procedure
- General Patient Guidelines During the Procedure
- Performing Patient Check-in
- Fitting Equipment on the Patient
- Chapter 5
- Know Your PillCam Recorder
- Chapter 6
- Performing PillCam Capsule Endoscopy
- Chapter 7
- Creating RAPID Videos
- Chapter 8
- Reviewing and Interpreting RAPID Videos
- Loading a Study with the Study Manager
- Using the Study Manager
- Overview of the RAPID Interface
- Using RAPID to View a Video
- RAPID Video Files
- Working with Findings
- Creating a PillCam Capsule Endoscopy Report
- RAPID Atlas
- Lewis Score
- Generating a Report
- Appendix A1
- Installing RAPID Software
- Appendix A2
- Configuring RAPID Software
- Appendix A3
- PillCam Equipment Maintenance
- Appendix A4
- Troubleshooting
- Appendix A5
- Technical Description
- System Labeling
- Essential Performance
- Warnings
- Cautions
- System Specifications
- PillCam SB 2 Capsule
- PillCam SB 3 Capsule
- PillCam UGI Capsule
- PillCam COLON 2 Capsule
- Sensor Array PillCam Recorder DR2
- Sensor Array PillCam Recorder DR3
- PillCam Recorder DR2/DR2C
- Cradle PillCam Recorder DR2
- PillCam Recorder DR3
- PillCam Recorder DR3 SDHC Memory Card
- Cradle PillCam Recorder DR3
- DC Power Supply
- RAPID for PillCam Software
- Guidance and Manufacturer's Declarations
- Index

Reviewing and Interpreting RAPID Videos
Overview of the RAPID Interface 123
To adjust the video image appearance:
1. Click in the ribbon to turn on Image Adjustment to the factory presets, or, if you saved your
preferences earlier, to your own presets.
2. If you wish to adjust the image otherwise, click in the ribbon. The following screen appears:
3. Select any of the active buttons FICE 1, FICE 2, FICE 3 or Blue for these preset image adjusters.
4. To adjust the image yourself, click Configure "On" Button. The screen expands.
5. The "On" state means that image adjustment is applied to the image. The expanded screen shows
the settings currently in effect.
6. Use the Sharpness, Brightness and Color sliders to get the desired result, as shown by the video
image of the open video that provides a preview of the changes you are making.
7. Click Save to save your settings. The next time you turn on the Image Adjustment, these settings
are applied.
8. If you wish to return to the factory preset, click Reset.
9. Click Close to close the Image Adjustment screen.