
User's Manual
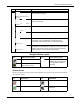
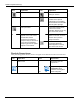
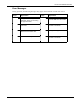
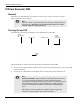
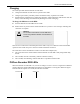
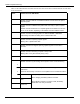

Table Of Contents
- User Manual
- RAPID® v8.3
- Table of Contents
- Chapter 1
- Using This Guide
- Chapter 2
- Indications, Contraindications, Warnings, Cautions
- Chapter 3
- Welcome to PillCam Capsule Endoscopy
- Chapter 4
- Preparing for PillCam Capsule Endoscopy
- Preparing the Patient
- Preparing the Required Equipment
- Creating Patient Instructions for the Procedure
- General Patient Guidelines During the Procedure
- Performing Patient Check-in
- Fitting Equipment on the Patient
- Chapter 5
- Know Your PillCam Recorder
- Chapter 6
- Performing PillCam Capsule Endoscopy
- Chapter 7
- Creating RAPID Videos
- Chapter 8
- Reviewing and Interpreting RAPID Videos
- Loading a Study with the Study Manager
- Using the Study Manager
- Overview of the RAPID Interface
- Using RAPID to View a Video
- RAPID Video Files
- Working with Findings
- Creating a PillCam Capsule Endoscopy Report
- RAPID Atlas
- Lewis Score
- Generating a Report
- Appendix A1
- Installing RAPID Software
- Appendix A2
- Configuring RAPID Software
- Appendix A3
- PillCam Equipment Maintenance
- Appendix A4
- Troubleshooting
- Appendix A5
- Technical Description
- System Labeling
- Essential Performance
- Warnings
- Cautions
- System Specifications
- PillCam SB 2 Capsule
- PillCam SB 3 Capsule
- PillCam UGI Capsule
- PillCam COLON 2 Capsule
- Sensor Array PillCam Recorder DR2
- Sensor Array PillCam Recorder DR3
- PillCam Recorder DR2/DR2C
- Cradle PillCam Recorder DR2
- PillCam Recorder DR3
- PillCam Recorder DR3 SDHC Memory Card
- Cradle PillCam Recorder DR3
- DC Power Supply
- RAPID for PillCam Software
- Guidance and Manufacturer's Declarations
- Index

PillCam Capsule Endoscopy
80 PillCam Recorder—Capsule Pairing (DR3 only)
PillCam Recorder—Capsule Pairing (DR3 only)
PillCam recorder DR3 operates only with capsules that were paired to it. This allows the PillCam recorder
to recognize images from the correct capsule. Pairing is initiated when the PillCam recorder recognizes
transmission from a designated capsule. From that point on, the recorder is associated with the capsule.
The recorder and capsule are then paired.
Designation of the capsule to be used in the procedure may be performed during patient check-in or
immediately before capsule ingestion. The following section describes these two scenarios.
Capsule Designation During Patient Check-in
While entering the patient and procedure data during check-in, type the capsule ID in the Capsule ID field
or use a barcode scanner. The capsule ID is displayed on the capsule package.
During recorder initiation, the unique capsule ID will be transferred into the PillCam recorder together with
the rest of the initiation data. It will appear on the PillCam recorder LCD together with the rest of the
patient data.
As long as no transmission from the checked in capsule is received, pairing is not done. The
Ready for
pairing icon remains in the top right corner of the screen.
If there are PillCam capsule transmissions received by the PillCam recorder, which are not from the
designated capsule, the capsule IDs of these other capsules (only of the checked-in capsule type) are
temporarily displayed on the PillCam recorder screen. Ready for pairing icon remains in the top right
corner of the screen.
When you open the designated capsule box, just before ingestion, the capsule starts blinking and
transmitting, each capsule type in its unique way. The PillCam recorder will automatically pair to the
designated capsule and start recording when it receives transmissions from it.
The
Pairing success icon will appear in the top right corner of the screen.
!
Warning
The PillCam recorder starts recording only after it is paired with the
capsule. If pairing is not complete, no video can be produced. Make sure
you see the Pairing Success icon on the screen and the capsule LED
on top of the recorder blinking in BLUE before capsule ingestion.
Capsule ID