
User's Manual
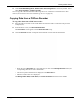
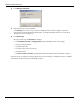
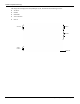
Table Of Contents
- User Manual
- RAPID® v8.3
- Table of Contents
- Chapter 1
- Using This Guide
- Chapter 2
- Indications, Contraindications, Warnings, Cautions
- Chapter 3
- Welcome to PillCam Capsule Endoscopy
- Chapter 4
- Preparing for PillCam Capsule Endoscopy
- Preparing the Patient
- Preparing the Required Equipment
- Creating Patient Instructions for the Procedure
- General Patient Guidelines During the Procedure
- Performing Patient Check-in
- Fitting Equipment on the Patient
- Chapter 5
- Know Your PillCam Recorder
- Chapter 6
- Performing PillCam Capsule Endoscopy
- Chapter 7
- Creating RAPID Videos
- Chapter 8
- Reviewing and Interpreting RAPID Videos
- Loading a Study with the Study Manager
- Using the Study Manager
- Overview of the RAPID Interface
- Using RAPID to View a Video
- RAPID Video Files
- Working with Findings
- Creating a PillCam Capsule Endoscopy Report
- RAPID Atlas
- Lewis Score
- Generating a Report
- Appendix A1
- Installing RAPID Software
- Appendix A2
- Configuring RAPID Software
- Appendix A3
- PillCam Equipment Maintenance
- Appendix A4
- Troubleshooting
- Appendix A5
- Technical Description
- System Labeling
- Essential Performance
- Warnings
- Cautions
- System Specifications
- PillCam SB 2 Capsule
- PillCam SB 3 Capsule
- PillCam UGI Capsule
- PillCam COLON 2 Capsule
- Sensor Array PillCam Recorder DR2
- Sensor Array PillCam Recorder DR3
- PillCam Recorder DR2/DR2C
- Cradle PillCam Recorder DR2
- PillCam Recorder DR3
- PillCam Recorder DR3 SDHC Memory Card
- Cradle PillCam Recorder DR3
- DC Power Supply
- RAPID for PillCam Software
- Guidance and Manufacturer's Declarations
- Index

Reviewing and Interpreting RAPID Videos
Loading a Study with the Study Manager 99
Archives
The Archives section displays the current procedure study archives that are accessible in the RAPID
software. The Study Manager can connect to procedure study archives located on the local computer,
on an accessible network, or a removable storage media such as a flash drive or a CD/DVD. The
different archive icons are explained below:
Adding an Archive
The instructions below demonstrate how to add an archive containing procedure studies that can be
accessed from the RAPID software. Portable drives connected to the computer's USB and studies
contained on a CD/DVD are detected and added automatically. The archives on the Study Manager can
be renamed or deleted but this will not affect the source directory of the archive.
To add an archive:
1. Click the Add button at the bottom left of the Study Manager screen. The Add Archive screen
appears.
2. Enter the archive path and the archive name that will appear below the archive.
• To browse for the archive on the local computer or on the network, click the Browse button.
An archive on a fixed drive, such as the computer's hard disk or a drive on the
network. The default archive is the one selected in Settings > Video > Video
directory. The archive is added and defined by the user using the Add button. This
is explained below in
Adding an Archive on page 99.
A portable drive containing procedure studies connected to the computer's USB.
Portable drives connected to the USB are automatically detected and cannot be
user defined.
Using the mouse, navigate to the USB connected device in My Computer, right
click and select Properties. Type the desired volume name and click OK.
Procedure studies stored on a CD/DVD in the computer's DVD bay. CD/DVD
archives are automatically detected and cannot be user defined.
֠
֠֠
֠
Note
Adding an archive provides a visual link to the directory using the Study
Manager. It does not copy the data locally to your computer. Removing an
archive using the Delete button does not delete data from the directory, but
only the path to the directory.