
User Guide


GNU Image Manipulation Program
80 / 653
marching-ant mode. You can also activate the QuickMask by selecting in the image window menu Select → Toggle QuickMask,
or by using the Shift-Q shortcut.
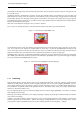
Activating the QuickMask shows you the selection as though it were a translucent screen overlying the image, whose transparency
at each pixel indicates the degree to which that pixel is selected. By default the mask is shown in red, but you can change this if
another mask color would be more convenient. The less a pixel is selected, the more it is obscured by the mask. Fully selected
pixels are shown completely clear.
When you are in QuickMask mode, many image manipulations act on the selection channel rather than the image itself. This
includes, in particular, paint tools. Painting with white causes the painted pixels to be selected; painting with black causes them
to be unselected. You can use any of the paint tools, as well as the bucket fill and gradient fill tools, in this way. Advanced users
of the GIMP learn that ‘painting the selection’ is the easiest and most effective way to delicately manipulate it.
Tip
To save the selection done by the Quickmask to a new channel; Make sure that there is a selection and that Quickmask
is not active in the image window. Select in the image menu Select/Save to Channel. This will create a new channel in
the channel dialog called SelectionMask 1.
Tip
When QuickMask is active, Cut and Paste act on the selection rather than the image. You can sometimes make use of
this as the most convenient way of transferring a selection from one image to another.
You can learn more on Quickmask and Selection masks in the section dedicated to the channel dialog.
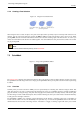
7.3.2 Properties
There are two QuickMask properties you can change by right-clicking on the QuickMask button.
• Normally the QuickMask shows unselected areas ‘fogged over ’ and selected areas ‘in clear’, but you can reverse this by
choosing ‘Mask Selected Areas’ instead of the default ‘Mask Unselected Areas’.
• By choosing ‘Configure Color and Opacity’, you can bring up a dialog that allows you to set these to values other than the
defaults, which are red at 50% opacity.
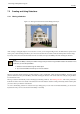
7.4 Using the Quickmask
1. Open an image or begin a new document;
2. Activate the Quickmask using the left-bottom button in the image window. If a selection is present the mask is initialized
with the content of the selection;
3. Choose any drawing tool. Paint on the Quick Mask using black color to remove selected areas and white color to add
selected areas. You can use grey colors to get partially selected areas.
You can also use selection tools and fill these selections with the Bucket Fill tool. This does not destroy the Qmask
selections!
4. Toggle off the Quickmask using the left-bottom button in the image window: the selection will be displayed with its
marching ants.