
User Guide


GNU Image Manipulation Program
44 / 653
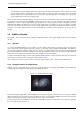
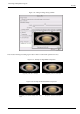
Figure 3.15: Dialog for Image Scaling in Inches
Perhaps you want your image to look more like a 4x6 inch photo on most image rendering web browsers. Simply switch the units
to ‘inches’ and put 4 inches in the height box (opting for smaller than 4x6 rather than bigger). You can see this dialog above.
Let The GIMP choose the other dimension length for you. Meaning, it will take more image knowledge to change both width and
height and have it look correct. So only change one and let The GIMP change the rest. To change the other length see Section
3.4.4.
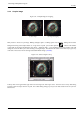
3.4.3 Make JPEGs Smaller
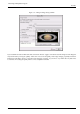
Figure 3.16: Example Image for JPEG Saving
You can make your jpegs smaller without changing the pixel width of the image. Actually you can change the weight of the
image a lot. I used an(other) image from APOD [APOD04]. The original image is huge (3000 pixels wide) so I also made a
smaller (pixel width) image available. To prepare this image for the web, you should first reduce the image to a better width and
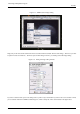
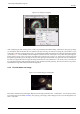
height for web viewing as described in the Section 3.4.2. Right click on the properly scaled image and follow the menus File
→ Save As... at the image window. The Save Dialog will pop up.
I generally type the filename I want into the text box, but the Extension drop menu can tell you the available file formats
(depending on the libraries you have installed and the conditions of the image you are trying to save). If The GIMP complains
right now, or if ‘JPEG’ is grayed out in the Extensions menu you should just cancel out of everything and step through the Section
3.4.6.
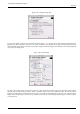
In the JPEG Save Dialog, you can opt for The GIMP defaults which reduce the size quite a bit, without hurting the visual quality
in a way that I can detect. This would be the safest and quickest thing to do.