
User Guide


GNU Image Manipulation Program
37 / 653
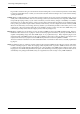
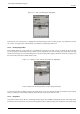
Figure 3.4: A dock, with docking bars highlighted
Each dock has a set of docking bars, as highlighted in the adjoining figure. These are thin gray bars, very unobtrusive and easy
not to notice: most people don’t realize that they exist until they are specifically pointed out.
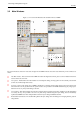
3.2.3.2 Docking Drag Handles
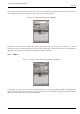
Each dockable dialog has a drag handle area, as highlighted in the figure on the right. You can recognize this by the fact that
the cursor changes to a hand shape when the pointer is over the drag handle area. To dock a dialog, you simply click on its drag
handle area, and drag it onto one of the docking bars in a dock: the dialog will be added to the aimed window. If you drag it onto
the aimed window itself, then it will be added as a tab.
Figure 3.5: A dialog in a dock, with the drag handle area highlighted.
This screenshot shows the area that allows to take a dialog off the dock.
You can drag more than one dialog onto the same docking bar. If you do, they will turn into tabs, represented by iconic symbols
at the top. Clicking on the tab handle will bring a tab to the front, so that you can interact with it.
3.2.3.3 Image Menu
Some docks contain an Image Menu: a menu listing all of the images open in GIMP, and displaying the name of the image whose
information is shown in the dock. You can use the Image Menu to select a different image (don’t confuse this menu for the Image