
User Guide


GNU Image Manipulation Program
323 / 653
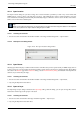
14.5.8.3 The ‘Save’ Dialog with a Browser
Figure 14.30: The ‘Save’ Dialog (Browser)
v
1
The left panel is divided into two parts. The upper part lists your main directories and your storage devices; you cannot
modify this list. The lower part lists your bookmarks; you can add or remove bookmarks. To add a bookmark, select a
directory or a file in the middle panel and click on the Add button at the bottom of the left panel. You can also use the
Add to bookmarks command in the context menu, which you get by clicking the right mouse button. You can delete a
bookmark by selecting it and clicking on the Remove button.
v
2
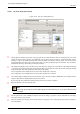
The middle panel displays a list of the files in the current directory. Change your current directory by double left-clicking
on a directory in this panel. Select a file with a single left click. You can then save to the file you have selected by clicking
on the Save button. Note that a double left click saves the file directly.
You can right click on the middle panel to access the Show Hidden Files command.
You can right click on the middle panel to access the Show Hidden Files command.
v
3
The selected image is displayed in the Preview window if it is an image created by GIMP. File size, resolution and the
image’s composition are displayed below the preview window.
If your image has been modified by another program, click on the preview to update it.
v
4
Enter the filename of the new image file here.
Note
If the image has already been saved, GIMP suggests the same filename to you. If you click on Save, the file is
overwritten.
v
5
This drop-down list is only available in the basic form of the dialog. It provides a list of bookmarks for selecting a
directory in which to save your file.
v
7
Above the middle panel, the path of the current directory is displayed. You can navigate along this path by clicking on
one of the buttons.