
User Guide


GNU Image Manipulation Program
322 / 653
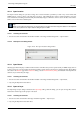
14.5.7 Save
The Save command saves your image to disk. If you have already saved the image, the previous image file is overwritten with
the current version. If you have not already saved the image, the Save command does the same thing as the Save As command:
GIMP opens the File Save dialog, so that you can choose the data format, the path and the filename of the new image file.
If the image was previously saved, it is automatically saved to the same location, using the same file name, file type, and options.
To save it differently in any respect, use either Save As or Save A Copy.
If you quit without having saved your image, GIMP asks you if you really want to do so, if the ‘Confirm closing of unsaved
images’ option is checked in the Environment page of the Preferences dialog.
14.5.7.1 Activating the Dialog
• You can access this command in the image menu bar through File → Save,
• or from the keyboard by using the shortcut Ctrl-S.
14.5.8 Save as
The Save as command displays the ‘File Save’ dialog. In its basic form, as shown below, this gives you a text box to assign a
name to the file, and a drop-down list of bookmarks to select a directory to save it in. Normally the file format is determined
by the extension you use in the file name (i.e., .jpg for a JPEG file). You can use the Select File Type option expander to pick a
different file type, but you should avoid doing this unless absolutely necessary, to avoid confusion.
If the directory you want is not in the list of bookmarks, click on Browse for other folders to expand the dialog to its full form.
You can find an explanation of the layout, and help on creating and using bookmarks, in the Files section.
If you saved the image previously and don’t need to change the file name or any of the options, you can use the
Save command
instead.
14.5.8.1 Activating the Command
• You can access this command from the image menubar through File → Save as,
• or by using the keyboard shortcut Shift-Ctrl-S.
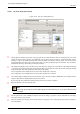
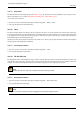
14.5.8.2 The Basic ‘Save as’ Dialog
There are two different forms of the Save as dialog. The simple form only lets you type in the filename and choose the directory
the file should be saved in. If the folder you want is not on the list, you can type in the path to the directory, along with the
filename. You can also click on the small triangle to display the full folder browser. You can also choose the image format, by
selecting the file extension (e.g., .xcf or .png).
Figure 14.29: The basic ‘File Save’ dialog