
User Guide


GNU Image Manipulation Program
173 / 653
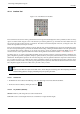
12.3.1.2 Tool Options
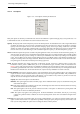
Figure 12.17: Tool Options shared by all brush tools
Many tool options are shared by several brush tools: these are described here. Options that apply only to one specific tool, or to
a small number of tools, are described in the sections devoted to those tools.
Opacity The Opacity slider sets the transparency level for the brush operation. To understand how it works, imagine that instead
of altering the active layer, the tool creates a transparent layer above the active layer and acts on that layer. Changing
Opacity in the Tool Options has the same effect that changing opacity in the Layers dialog would have in the latter
situation. It controls the ‘strength’ of all brush tools, not just those that paint on the active layer. In the case of the Eraser,
this can come across as a bit confusing: it works out that the higher the ‘opacity’ is, the more transparency you get.
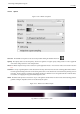
Mode The Mode dropdown list provides a selection of paint application modes; a list of modes can be found in the glossary. As
with the opacity, the easiest way to understand what the Mode setting does is to imagine that the paint is actually applied
to a layer above the layer you are working on, with the layer combination mode in the Layers dialog set to the selected
mode. You can obtain a great variety of special effects in this way. The Mode option is only usable for tools that can be
thought of as adding color to the image: the Pencil, Paintbrush, Airbrush, Ink, and Clone tools. For the other brush tools,
the option appears for the sake of consistency but is always grayed out.
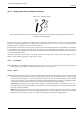
Brush The brush determines how much of the image is affected by the tool, and how it is affected, when you trace out a
brushstroke with the pointer. GIMP allows you to use several different types of brushes, which are described in the
Brushes section. The same brush choices are available for all brush tools except the Ink tool, which uses a unique type of
procedurally generated brush. The colors of a brush only come into play for tools where they are meaningful: the Pencil,
Paintbrush, and Airbrush tools. For the other brush tools, only the intensity distribution of a brush is relevant.
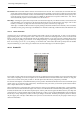
Pressure Sensitivity The Pressure Sensitivity section is only meaningful if you are using a tablet: it allows you to decide which
aspects of the tool’s action should be affected by how hard you press the stylus against the tablet. The possibilities are
opacity, hardness, rate, size, and color. They work together: you can enable as many of them as you like. For each tool,
only the ones that are meaningful are listed. Here is what they do:
Opacity The effect of this option is described above.
Hardness This option applies to brushes with fuzzy edges. If it is enabled, the harder you press, the darker the fuzzy parts
of the brush will appear.
Rate This option applies to the Airbrush, Convolve tool, and Smudge tool, all of which have time-based effects. Pressing
harder makes these tools act more rapidly.
Size This option applies to all of the pressure sensitive brush tools. If the option is checked, then pressing harder will
increase the size of the area affected by the brush.
Color This option only applies to the painting tools: the Pencil, Paintbrush, and Airbrush; and only if you are using
colors from a gradient. If these conditions are met, then pressing harder causes colors to be taken from higher in the
gradient.
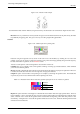
Fade Out This option causes each stroke to fade out over the specified distance. It is easiest to visual for painting tools, but
applies to all of the brush tools. It is equivalent to gradually reducing the opacity along the trajectory of the stroke. Note
that, if you are using a tablet, this option does not change the effects of brush pressure.