
User Guide


GNU Image Manipulation Program
172 / 653
12.3 Brush Tools
12.3.1 Common Features
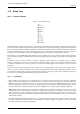
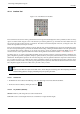
Figure 12.16: The Brush tools
The GIMP Toolbox includes nine "brush tools", all grouped together at the bottom (in the default arrangement). The feature they
all have in common is that all of them are used by moving the pointer across the image display, creating brushstrokes. Four of
them – the Pencil, Paintbrush, Airbrush, and Ink tools – behave like the intuitive notion of "painting" with a brush. The others
use a brush to modify an image in some way rather than paint on it: the Eraser erases; the Clone tool copies from a pattern or
image; the Convolve tool blurs or sharpens; the Dodge/Burn tool lightens or darkens; and the Smudge tool smears.
The advantages of using GIMP with a tablet instead of a mouse probably show up more clearly for brush tools than anywhere
else: the gain in fine control is invaluable. These tools also have special ‘Pressure sensitivity’ options that are only usable with a
tablet.
In addition to the more common ‘hands-on’ method, it is possible to apply brush tools in an automated way, by creating a
selection or path and then ‘stroking’ it. You can choose to stroke with any of the brush tools, including nonstandard ones such
as the Eraser, Smudge tool, etc., and any options you set for the tool will be applied. See the section on Stroking for more
information.
Brush tools work not only on image layers, but on other types of drawable objects as well: layer masks, channels, and the
selection. To apply a brush tool to a layer mask or channel, simply make it the image’s active drawable by clicking on it in the
Layers dialog or Channels dialog. To apply a brush tool to the selection, switch to QuickMask mode. ‘Painting the selection’ in
this way is a very powerful method for efficiently creating precise selections.
12.3.1.1 Key modifiers
• Ctrl : Holding down the Ctrl key has a special effect on every brush tool except the ink tool. For the Pencil, Paintbrush,
Airbrush, Eraser, and Smudge tools, it switches them into ‘color picker’ mode, so that clicking on an image pixel causes
GIMP’s foreground to be set to the active layer’s color at that point (or, for the Eraser, GIMP’s background color). For the
Clone tool, the Ctrl key switches it into a mode where clicking sets the reference point for copying. For the Convolve tool, the
Ctrl key switches between blur and sharpen modes; the the Dodge/Burn tool, it switches between dodging and burning.
• Shift: Holding down the Shift key has the same effect on all brush tools: it places the tool into straight line mode. To create
a straight line with any of the brush tools, first click on the starting point, then press the Shift key. As long as you hold it
down, you will see a thin line connecting the previously clicked point with the current pointer location. If you click again,
while continuing to hold down the Shift key, a straight line will be rendered. You can continue this process to create a series of
connected line segments.
• Ctrl-Shift: Holding down both keys puts the tool into constrained straight line mode. This is similar to the effect of the Shift
key alone, except that the orientation of the line is constrained to the nearest multiple of 15 degrees. Use this if you want to
create perfect horizontal, vertical, or diagonal lines.