
User Guide

GNU Image Manipulation Program
102 / 653
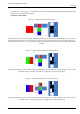
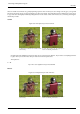
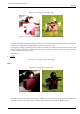
Figure 8.4: Alpha channel example: Three layers transparent
The left part of the third layer has been made transparent. The Alpha channel is still white and the left part of the layer is white,
opaque! The background layer has no Alpha channel. In this case, the Clear command works like the Eraser and uses the
Background color of Toolbox.
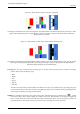
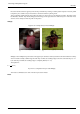
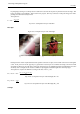
Figure 8.5: Alpha channel example: Alpha channel added to the Background
We used the LayerTransparencyAdd Alpha Channel command, which is active on the Background layer only. Now, the left part
of the image is fully transparent and has the color of the page the image is lying on. The left part of the Alpha Channel
thumbnail is black (transparent) in the Channel Dialog.
Layer type The layer type is determined by the image type (see previous section) and the presence or absence of an alpha
channel. These are the possible layer types:
• RGB
• RGBA
• Gray
• GrayA
• Indexed
• IndexedA
The main reason this matters is that most filters (in the Filters menu) only accept a subset of layer types, and appear grayed
out in the menu if the active layer does not have an acceptable type. Often you can rectify this either by changing the mode
of the image or by adding or removing an alpha channel.
Visibility It is possible to temporarily remove a layer from an image, without destroying it, by clicking on the symbol
in the Layers dialog. This is called ‘toggling the visibility’ of the layer. Most operations on an image treat toggled-off
layers as if they did not exist. When you work with images containing many layers, with varying opacity, you often can
get a better picture of the contents of the layer you want to work on by hiding some of the other layers.