
User Guide


GNU Image Manipulation Program
100 / 653
Chapter 8
Combining Images
8.1 Introduction to Layers
A good way to visualize a GIMP image is as a stack of transparencies: in GIMP terminology, each individual transparency is
called a layer. There is no limit, in principle, to the number of layers an image can have: only the amount of memory available
on the system. It is not uncommon for advanced users to work with images containing dozens of layers.
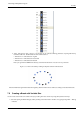
The organization of layers in an image is shown by the Layers dialog, which is the second most important type of dialog window
in GIMP, after the Main Toolbox. The appearance of the Layers dialog is shown in the adjoining illustration. How it works is
described in detail in the Layers Dialog section, but we will touch on some aspects of it here, in relation to the layer properties
that they display.
Each open image has at any time a single active drawable. A ‘drawable’ is a GIMP concept that includes layers, but also several
other types of things, such as channels, layer masks, and the selection mask. (Basically, a ‘drawable’ is anything that can be
drawn on with painting tools). If a layer is currently active, it is shown highlighted in the Layers dialog, and its name is shown
in the status area of the image window. If not, you can activate it by clicking on it. If none of the layers are highlighted, it means
the active drawable is something other than a layer.
In the menubar above an image window, you can find a menu called Layer, containing a number of commands that affect the
active layer of the image. The same menu can be accessed by right-clicking in the Layers dialog.
8.1.1 Layer Properties
Each layer in an image has a number of important attributes:
Name Every layer has a name. This is assigned automatically when the layer is created, but you can change it. You can change
the name of a layer either by double-clicking on it in the Layers dialog, or by right-clicking there and then selecting the
top entry in the menu that appears, Edit Layer Attributes.
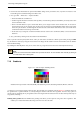
Presence or absence of an alpha channel As explained in the previous section, an alpha channel encodes information about
how transparent a layer is at each pixel. It is visible in the Channel Dialog: white is complete opacity, black is complete
transparency and grey levels are partial transparencies.
The background layer is particular. If you have just created a new image, it has still only one layer which is a background
layer. If the image has been created with an opaque Fill type, this one layer has no Alpha channel. If you add a new
layer, even with an opaque Fill type, an Alpha channel is automatically created, which applies to all layers apart from the
background layer. To get a background layer with transparency, either you create your new image with a transparent Fill
type, or you use the Add an Alpha Channel.
Every layer other than the bottom layer of an image must have an alpha channel. For the bottom layer, it is optional.
Many operations cannot be performed on layers that lack an alpha channel. Moving the layer to a different position in the
layer stack is one obvious example (since only bottom layers are allowed not to have an alpha channel), but any operation
involving transparency would also be included. You can add an alpha channel to a layer that lacks one using the menu